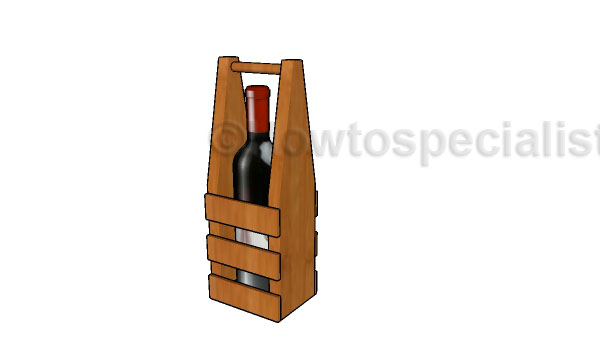
This step by step woodworking project is about diy wood wine caddy plans. If you run out of ideas and you are looking for a simple woodworking project you can offer as a gift to a loved one, you should take a look over my plans. This wine caddy would also make a wonderful mother’s day gift and the best part is that it only costs a few dollars to make. You can get the job done in a few hours, even if this is your first project. See my other chalkboard project for more DIY inspiration.
We recommend you to invest in the best materials you could afford. Therefore, you should buy weather-resistant lumber, such as pine or cedar. Always take accurate measurements before adjusting the size of the components at the proper size. Drill pilot holes trough the components before inserting the wood screws, to prevent the wood from splitting. See all my Premium Plans in the Shop.
Made from this plan
It’s that easy to build a wine caddy!
Building a wine caddy
Materials
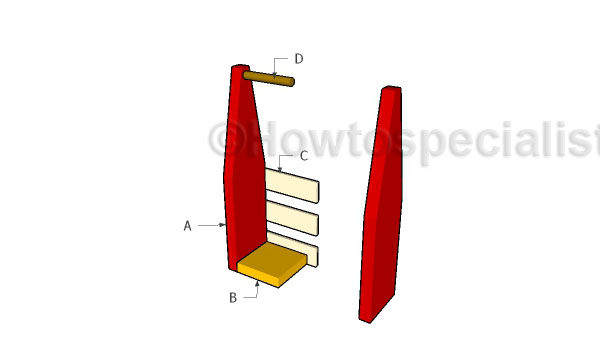
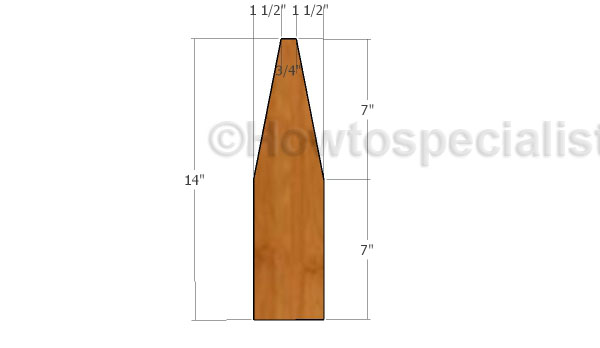
- A – 2 pieces of 1×4 lumber – 14″ long ENDS
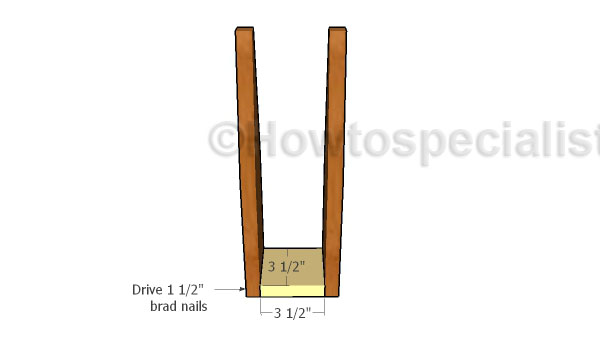
- B – 1 piece of 1×4 lumber – 3 1/2″ long BOTTOM
- C – 6 pieces of 1×2 lumber – 5″ long FACES
- D – 1 piece of 1/2″ dowel – 3 1/2″ long HANDLE
- 1 piece of 1×4 lumber – 6′
- 1 pieces of 1×2 lumber (1/4″ thick) – 6′
- 1 piece of 1/2″ dowel
- 1 1/2″ brad nails, 3/4″ brad nails
- stain, glue
Tools
- Safety gloves, glasses
- Miter saw, jigsaw
- Chalk line, tape measure, spirit level, carpentry pencil
- Drill machinery and drill bits
Time
- One Day
DIY Wood Wine Caddy Plans
If you want to see how I built this wood wine caddy, take a look over the plans, as well as over the step by step tutorial.
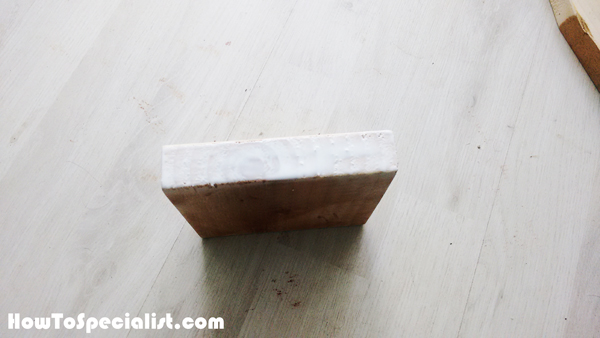
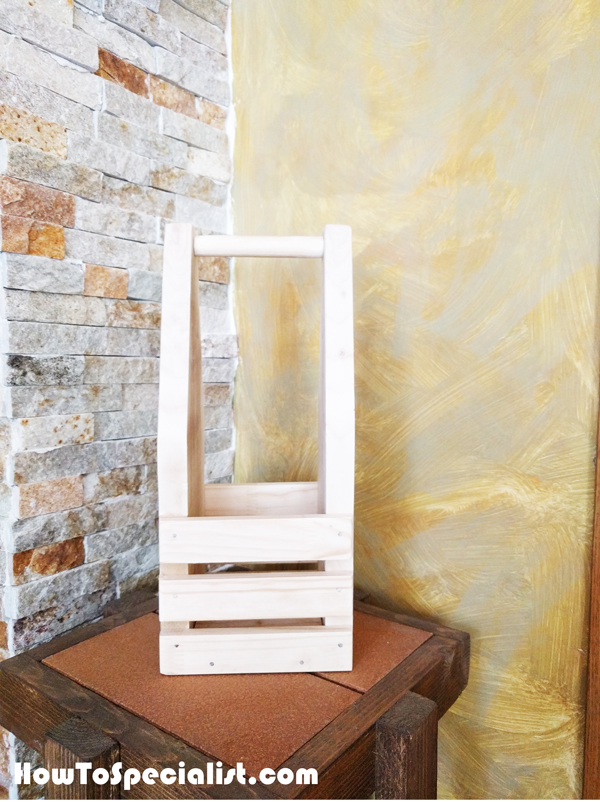
Building the sides of the caddy
Cut the ends for the wine caddy from 1×4 lumber. Get the job done with a saw and smooth the edges with sandpaper.
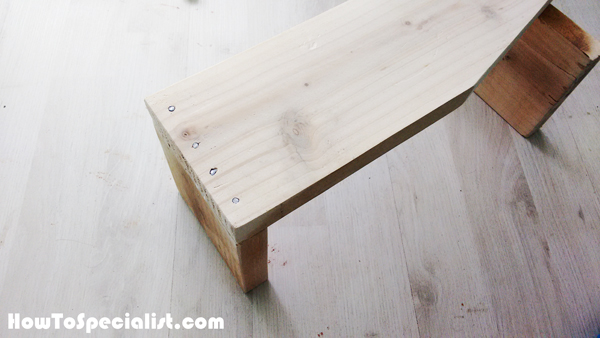
Assembling the caddy
Attach the bottom to the ends of the wine caddy. Apply wood glue to the joints and insert 1 1/2″ brad nails to get the job done in a professional manner.
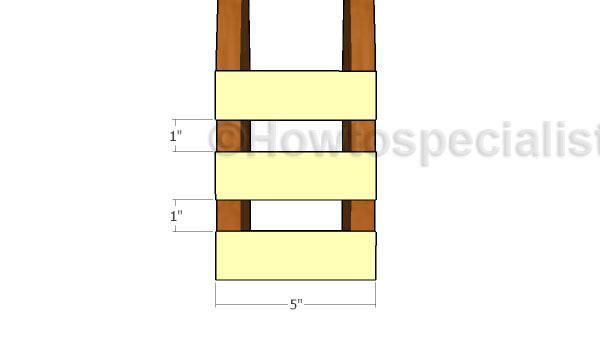
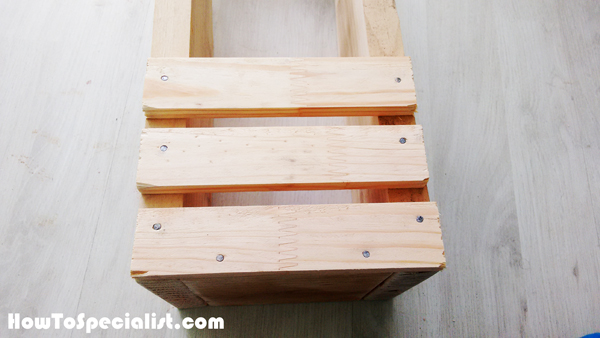
Fitting the side slats
Fit the 1×2 strips of wood to the sides of the wine caddy (1/4″ thick). Use 3/4″ brad nails and glue to secure the strips into place.
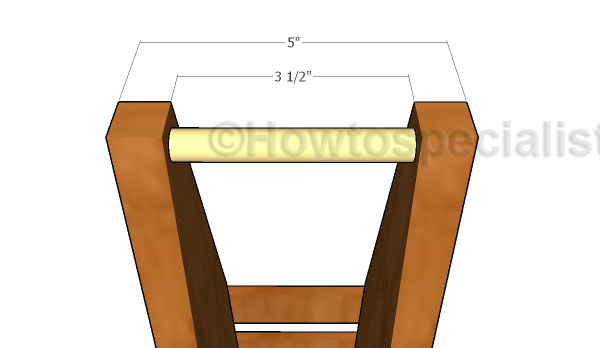
Fitting the handle
Secure the 1/2″ handle to the top of the caddy with glue and 1 1/2″ brad nails. Alternatively, you can drill 1/2″ pilot holes through the sides and insert the handle into the ends for more support. Add glue to the joints.
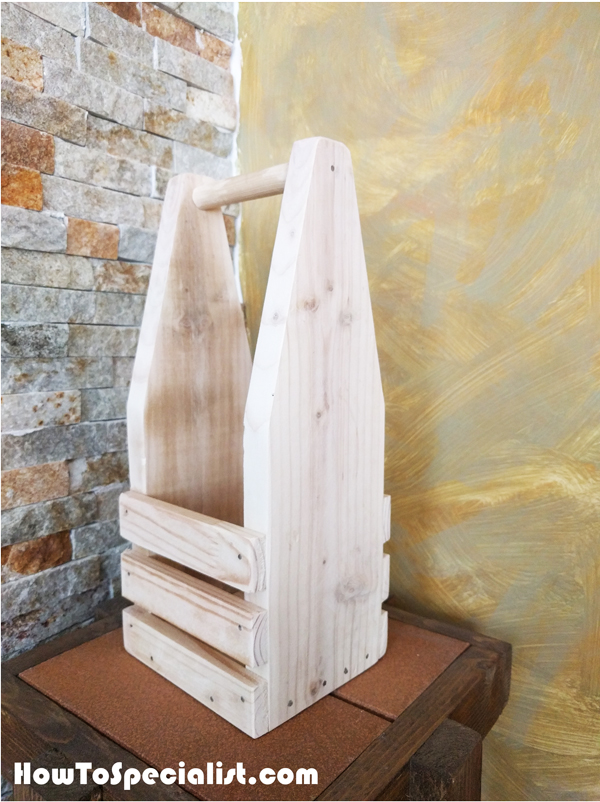
Wine Caddy Plans
Smooth the edges and cover the components with a few coats of stain.
How to build a wine carrier
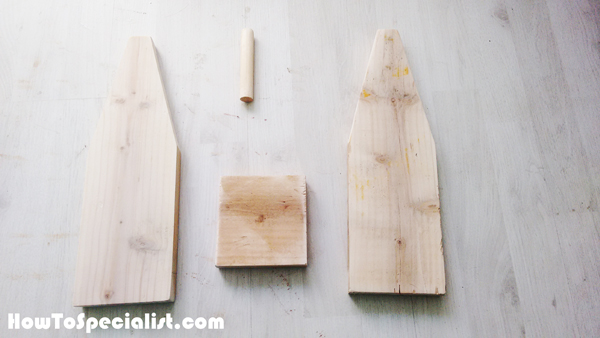
First of all I cut the components for the frame of the wine caddy: the ends, the bottom and the handle. I marked the cut lines on the 1×4 slats and I get the job done with my jig saw. Make sure the blade goes exactly over the cut lines and then smooth the edges thoroughly with a random sander to even out the gaps and dents.
Next, I added glue to the edges of the bottom piece. Make sure you spread the glue evenly to the edges, so the components bond together properly. I used my finger, but you can use a small brush or something similar, if you don’t want to get into contact with the glue.
I aligned the edges flush and then inserted a few 1 1/2″ brad nails to lock the components together properly. Make sure the corner is right angled before inserting the nails, for a professional result. Don’t forget to adjust the size of the caddy to the wine bottle you have, as their sizes differ.
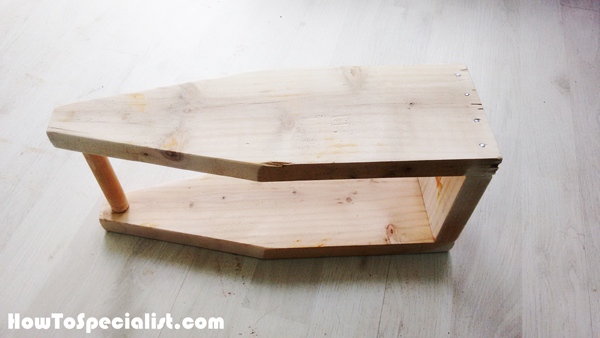
Fit the 1/2″ handle to the top of the wine caddy. Center the dowel to the ends and then secure it into place by inserting 1 1/2″ nails. Add glue to the joints, so the dowel won’t move from position.

Next, I attached the 1×2 strips to the sides of the wine caddy (1/4″ thick). I secured the strips of wood to the frame of the wine caddy with 3/4″ brad nails and glue. Make sure you use a spacer between the slats so you get even gaps.
The wine caddy is starting to take shape. If you like the rustic look them you shouldn’t sink the head of the nails into the wood and let them visible.
After assembling the wine caddy I use my random sander to even out the sharp edges and to smooth the dents in the wood. Make sure you take your time, as this step is very important.
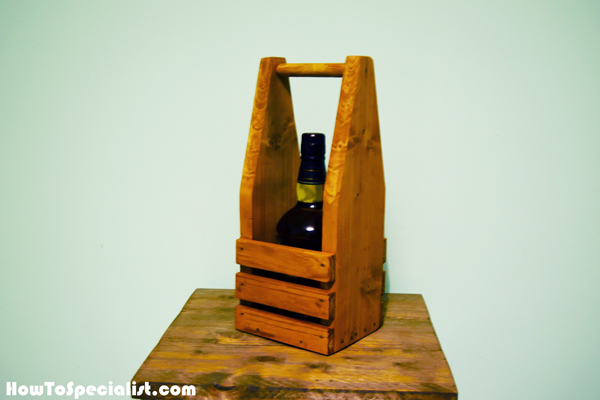
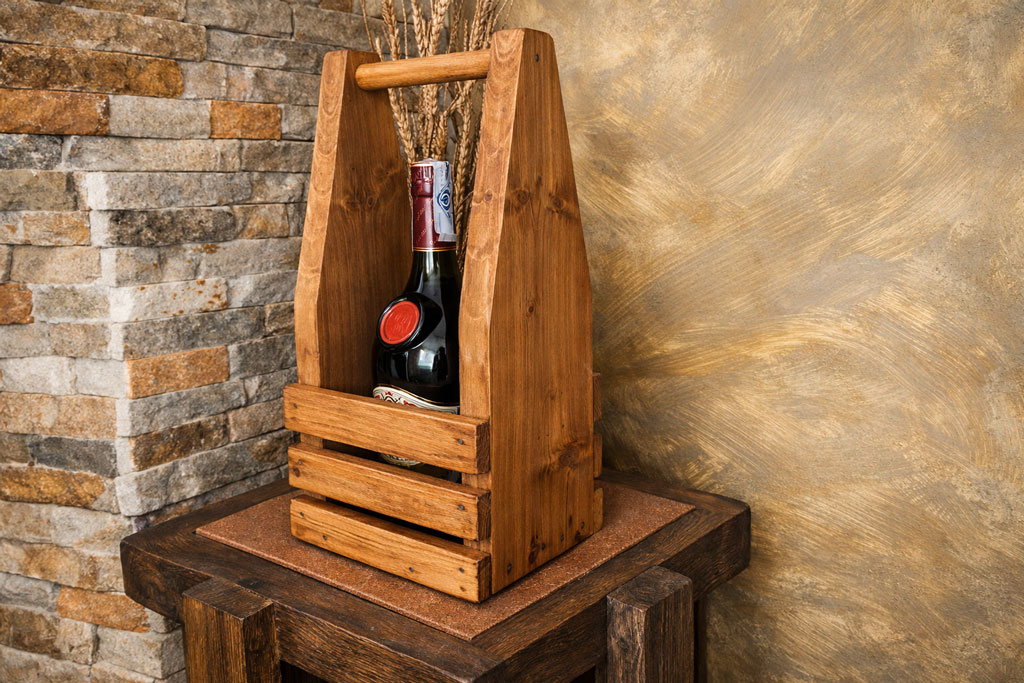
The wood wine carries came out as I imagined it and I couldn’t be more happier with the end result. Now, I only have to apply a few coats of stain to enhance the look of the natural look of the wood and to protect the components from decay.
This wine caddy makes for an awesome mother’s day gift idea. You can customize the project and leave your own touch by choosing the colors or by making a few carvings to the ends of the caddy.
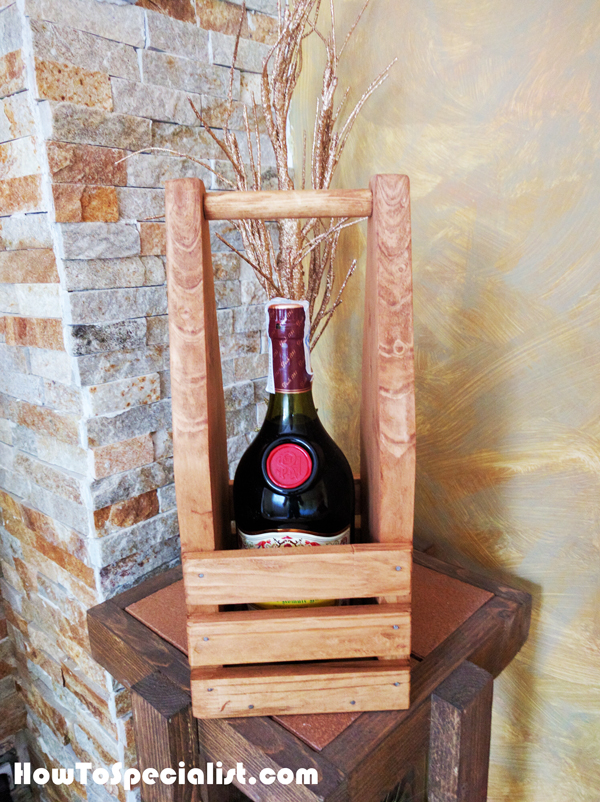
I used a teak stain to cover the wood. I let it dry out for a few hours then sealed everything with a few coats of stray lacquer.

All in all, this project only cost me 5 dollars to make, considering I already had the stain. It was a great and fun weekend project which challenged me to come with an design unlike anything else out there. I designed this caddy, as it would make for an excellent gift for anyone who appreciates handmade projects. This is one of my favorite projects to date, as it has a very elegant look to it. If you like my wine caddy, don’t forget to SHARE it on Facebook and Pinterest.
Thank you for reading our project about how to make a wine caddy and I recommend you to check out the rest of the projects. Don’t forget to LIKE and SHARE our projects with your friends, by using the social media widgets. SUBSCRIBE to be the first that gets our latest projects.