This step by step diy project is about how to build an chalkboard with shelves and key holder. If you want to learn more about building a wooden chalkboard with shelves and key holder, pay attention to this project. This project is ideal for an entryway. I teamed up with Julian from MyOutdoorPlans for this project. You can see the step by step plans here.
You should always plan everything from the very beginning, in order to prevent costly mistakes and to save time. In most of the cases, you need a friend to give you a hand when assembling the wood chalkboard. Invest in high quality lumber and plywood, as the components will be exposed to bad weather. Protect the components with appropriate paint or stain.
There are a few tips that you should take into account, if you want to get a professional result. Therefore, take accurate measurements and use professional tools when making the cuts or when drilling pilot holes. Align the components at both ends and add waterproof glue to the joints, if you want to create a rigid structure.
Made from this plan
How to Build a Chalkboard with Shelves and Key Holder

Make sure you check out my step by step tutorial if you want to learn how to build this chalkboard with shelves and key holder. I have a lot of fun building this project, as I loved working with chalkboard paint. It’s like having a white piece of paper in front of you, inviting you to create and to leave your stamp on it.

Building a chalkboard with shelves
Julian created these simple plans so anyone can build this chalkboard with shelves. See the plans with a list of materials here.

Building the frame
The first step of the woodworking project is to build the frame of the chalkboard. Cut the components at the right dimensions and lock them together with 1 1/4″ screws. I used 1×3 lumber for the frame. I drilled pocket holes at both ends of the vertical slats. Make sure the corners are square and check if the edges are perfectly flush, before inserting the screws.

Fitting the panel
The next step of the project is to fit the panel into place. You can use a strip of 1×10 lumber or 3/4″ plywood. Drill pocket holes along the edges of the panel and secure it to the frame using 1 1/4″ screws. Add glue to the joints and leave no gaps between the components.

Fitting the middle support
Fit the middle support to the frame, as it can be see in the diagram. Drill pocket holes at both ends of the support and secure it to the sides using 1 1/4″ screws. Use a clamp to hold the components tightly when inserting the 1 1/4″ screws. Add glue to the joints for a durable result.

Painting the chalkboard frame
I applied a few coats of paint over the components before attaching the back chalkboard panel. You can you a water based paint or stain.

Applying the chalkboard
Next, I applied chalkboard paint over a 1/4″ plywood panel. I got the plywood from a previous project, as I like to recycle materials, especially for that rustic look.

Attaching the chalkboard
I attached the plywood panel to the frame and secured it into place using brad nails. Make sure you leave no gaps between the components. Add glue to the frame to enhance the bond of the components.

Building the shelves
Build the ledges for the chalkboard out of 1×4 and 1×3 lumber. I used 1×4 lumber for the bottom and 1×3 slats for the front. Align the components and clamp them together tightly. Add glue to the joints and insert 1 1/4″ nails to lock the components together tightly.

Attaching the shelves
I drilled pocket holes through the bottom slat and secure the ledges to the panel using glue and 1 1/4″ screws. Make sure there are no gaps between the slats and the panel.

Fitting the side slats
Fit the sides to the shelves, as shown in the diagram. Use glue and finishing nails to lock the components together tightly. Round the exposed edges with a jigsaw and smooth the edges with fine-grit sandpaper.

Attaching the hooks
Last but not least, I attached the hooks to the bottom of the chalkboard with shelves.

Chalkboard with hooks
In addition, I attached a 1×2 trim to the top of the frame. I used glue and 1 1/4″ screws to lock the trim into place tightly.

Chalkboard with shelves
I used small L brackets to secure the chalkboard with shelves to the wall, but you can use french cleats or other hanging systems.

Securing the shelves to the wall
I used a spirit level to make sure the top is horizontal and then marked the holes. Make sure you use a stud finder to secure at least one L-bracket into the stud. Alternatively, you should use heavy duty anchors.

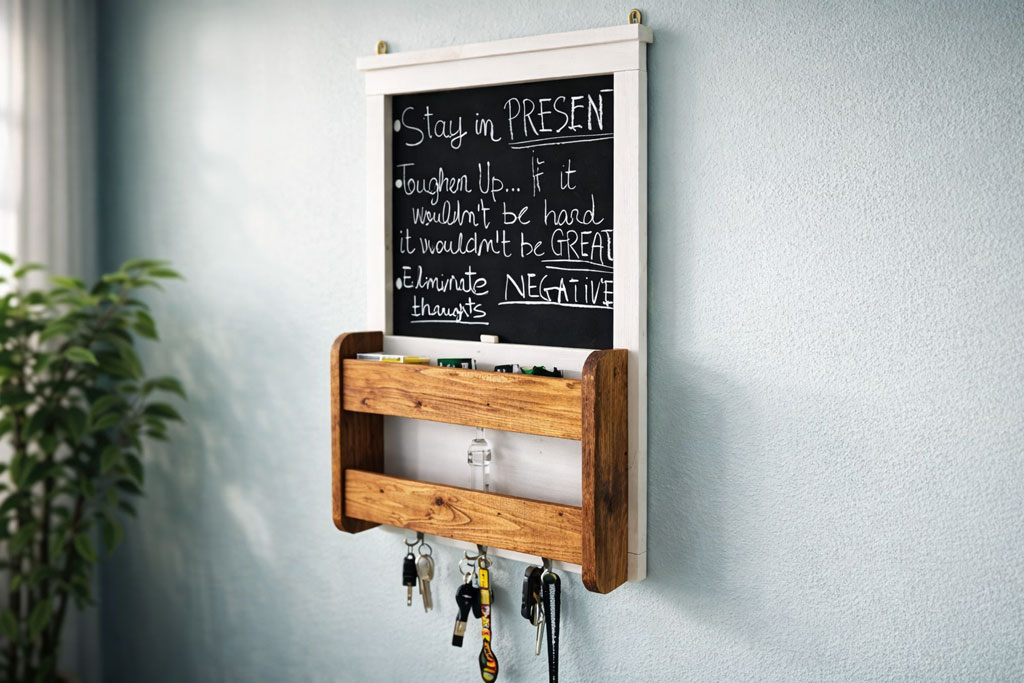
Wall Shelves with Chalkboard
If you don’t like the slightly distressed look, you can spend more time on the finishing detailed. Therefore, invest in higher quality lumber and smooth the edges with 120-220 grit sandpaper. Fill the dents with wood putty and smooth the surface with sandpaper, before applying the finish.

Chalkboard Key Holder
See the step by step plans for this project here. Julian did an amazing job with these plans, so don’t forget to check his projects out.
Thank you for reading our project about chalkboard with shelves and key holder and we recommend you to check out the rest of the projects. Don’t forget to SHARE and LIKE our projects with your friends, by using the social media widgets, if you want to help us keep adding free woodworking plans.