This article is about small greenhouse plans free. If you live in an area with cold weather or you want to build a construction to store your plants during the cold winter nights, this article will answer to all your questions. In addition, by using our wooden greenhouse plans free, you will be able to grow your own vegetables, starting with early spring and up to late autumn. If you pay attention to the most important aspects, such as the location of the greenhouse and the materials used during the construction process, you will have your own backyard greenhouse in just a weekend.
You should set the location of the small greenhouse in such a manner that it gets maximum sunlight all day long. If you have a large garden, the best solution is to place it far away from buildings or trees, otherwise try to build it as to get the morning light from east. This aspect is essential for your project, therefore pay attention when choosing the location of your greenhouse. Your hard work will pay off on the long run, as plants need the sunlight to produce food, especially in the morning.
Choosing the right materials for the job might be a difficult task at first, as you need time to decide the best solution to your own needs. If you have a small budget and want to get the job done quickly, we recommend you to build a wooden greenhouse, using 4×4 and 2×4 posts. On the other hand, if you don’t have time to undertake a serious project or you prefer a light construction, you should consider using PVC pipes. Nevertheless, in this article we show you plans for a small wooden greenhouse, to help you grow your own organic vegetables and keep the plants in an appropriate climate during the winters. See all my Premium Plans in the Shop.
Made from this plan
In order to build a small greenhouse, you need the following:
- 6′ long 4×4 wooden posts
- plastic strips to support the foil
- 6” long nails / screws
- 500 pieces of 2 1/2″ screws
- film
- vent opener
- thermostat outlet
- hinges + latch
Tools
- Safety gloves, glasses
- Circular saw
- Hammer, spirit level, carpentry pencil
Tips
- Place the greenhouse in an area where it gets the maximum sunlight
- Place the side posts every 2′ / 60 cm
- Install plastic strips every 1′, to support the foil
Time
- One weekend, two workers
My best tips for building a wooden gable greenhouse:
A wooden gable greenhouse is a fantastic project that allows you to create a functional and beautiful space for growing plants year-round. The classic gable design, with its sloped roof and sturdy frame, maximizes sunlight and provides ample headroom. Here are my best tips for building a wooden gable greenhouse that’s both practical and stylish.
1. Plan the Size and Design
Before you start building, carefully plan the size and layout of your greenhouse:
- Size: A common size for a home greenhouse is around 8×12 feet or 10×16 feet, but you can adjust the dimensions based on your space and needs. Make sure to plan for enough room to walk around and work inside.
- Roof pitch: The gable roof is defined by its sloped sides, which help with water runoff and prevent snow buildup in winter. A 30-40 degree angle is ideal for most climates.
- Materials: Use pressure-treated wood or cedar for the frame, as these materials resist rot and weathering. For the covering, consider polycarbonate panels or UV-resistant greenhouse plastic, which allow maximum sunlight while protecting plants from harsh weather.
- Windows and ventilation: Plan for ventilation windows or roof vents to allow hot air to escape during the summer, helping regulate the temperature inside.
Taking time to plan your design ensures that your greenhouse will be functional and meet your gardening needs.
2. Choose the Right Location
The location of your greenhouse is crucial for plant growth and the structure’s longevity:
- Maximize sunlight: Choose a location that gets at least 6-8 hours of direct sunlight per day. A north-south orientation is ideal, as it helps capture sunlight throughout the day.
- Level the ground: Make sure the ground is flat and level before building. If the site is uneven, level it with gravel or pavers to create a stable base for the structure.
- Access to water and electricity: If you plan to install a watering system or use grow lights or heaters, ensure the greenhouse is close to a water source and power outlet.
The right location will help your plants thrive and make the greenhouse easier to maintain.
3. Prepare the Foundation
A solid foundation is key to a sturdy and long-lasting greenhouse:
- Concrete or pavers: For a permanent structure, consider pouring a concrete slab or using pavers to create a solid base. This provides excellent stability and prevents weeds from growing inside the greenhouse.
- Wooden base: If you prefer a simpler foundation, build a wooden base using pressure-treated lumber. Lay the frame on gravel or concrete footings to keep it stable and off the ground, preventing moisture from seeping in.
- Anchor the structure: Secure the greenhouse to the foundation using anchor bolts or brackets to prevent it from shifting or being damaged by strong winds.
A well-prepared foundation ensures your greenhouse remains stable and level over time.
4. Build the Frame
The frame is the most important part of your greenhouse, as it supports the roof and walls:
- Cut the frame pieces: Use 2x4s or 2x6s for the vertical posts and horizontal beams. Cut the lumber to size, ensuring all the measurements match the planned design.
- Assemble the sidewalls: Start by building the sidewalls first, attaching the vertical posts to the horizontal beams using galvanized screws or bolts. Space the posts about 2-3 feet apart to provide enough support for the roof and covering.
- Add cross supports: Install diagonal cross braces between the posts to add extra stability, especially in areas prone to high winds.
- Build the roof frame: For the gable roof, cut angled rafters that will meet at the peak of the roof. Attach the rafters to a ridge beam running along the top of the greenhouse. Space the rafters about 24 inches apart to support the roof covering.
Double-check that the frame is square and level before moving on to the roof and walls.
5. Install the Roof and Wall Panels
Once the frame is up, it’s time to add the covering for the roof and walls:
- Polycarbonate panels: If using polycarbonate panels, cut them to size and attach them to the frame using special screws with rubber washers to prevent leaks. Start with the roof, then work your way down to the walls.
- Greenhouse plastic: For a lighter option, use UV-resistant polyethylene sheeting for the roof and walls. Secure the plastic to the frame using batten strips or staples, pulling it tight to avoid sagging.
- Overlap the panels: When installing the panels or plastic, make sure to overlap the edges by at least 1-2 inches to prevent gaps where air or moisture could enter.
Ensure the roof and walls are securely attached and watertight to protect your plants from the elements.
6. Add Doors and Windows
Ventilation is essential for regulating the temperature and humidity inside the greenhouse:
- Install a sturdy door: Build or install a wooden or aluminum-framed door at the front of the greenhouse. The door should fit snugly and be easy to open and close. Consider adding a screen door for extra ventilation during hot months.
- Add windows or vents: Install windows or roof vents to allow excess heat to escape. Automatic vent openers are available if you want a hands-free solution for regulating the temperature.
Proper ventilation prevents overheating and ensures healthy plant growth.
7. Seal and Insulate the Greenhouse
To ensure your greenhouse maintains the right temperature and humidity levels:
- Seal any gaps: Use weather stripping or caulk to seal any gaps between the frame and the panels. This helps keep out drafts and pests while retaining heat.
- Add insulation: For colder climates, consider adding bubble wrap insulation to the inside of the greenhouse walls to retain heat during the winter months. Attach the bubble wrap using clips or tape, leaving the windows clear for ventilation.
Proper sealing and insulation help maintain a stable environment inside the greenhouse, especially during colder seasons.
8. Add Shelving and Benches
To maximize the space inside your greenhouse:
- Install shelving: Add sturdy wooden or metal shelves along the sidewalls to hold potted plants, seed trays, and gardening tools. Make sure the shelves are securely fastened to the frame.
- Build a potting bench: Create a potting bench near the entrance for easy access to tools and supplies. This gives you a dedicated workspace for planting and transplanting.
Shelving and benches keep your greenhouse organized and allow you to make the most of the available space.
Bonus Tip: Add a Watering System for Convenience Consider installing a drip irrigation system or misting system in your greenhouse to keep your plants hydrated without manual watering. This is especially useful if you’re growing plants that need consistent moisture.
Small greenhouse plans

Small greenhouse frame plans
First of all, you have two broad alternatives for the base of the small greenhouse. On one hand, you could dig holes and set the posts in concrete, or you might want to build a rectangular frame and anchor the posts to it.
Prepare the area thoroughly, ensuring the surface is perfectly level. In addition, you should consider building concrete footings for the greenhouse, if you plan a permanent construction.

Small greenhouse plans
After you have secured the base frame with screws, you have to install the wooden posts, every 2′. The 4×4 wooden posts should be about 6′ high, but you can adjust their dimension according to your needs and wants.
Work with great care and don’t forget to use a spirit level, every time you set a post. In this manner, the side posts of the greenhouse will be aligned and perfectly plumb.

Small greenhouse plans
In this image, you should notice the way you have to anchor the posts to the base frame. Locking the posts into place is easy, if you use corner brackets and screws. In addition, we recommend you to install at least one beam diagonally, between two consecutive posts, on each side of the greenhouse.

Small greenhouse plans free
Continue the project by installing studs on the front and back faces of the greenhouse. As you see in the image, you have to install 8′ high posts in the center of the front and back faces of the greenhouse.

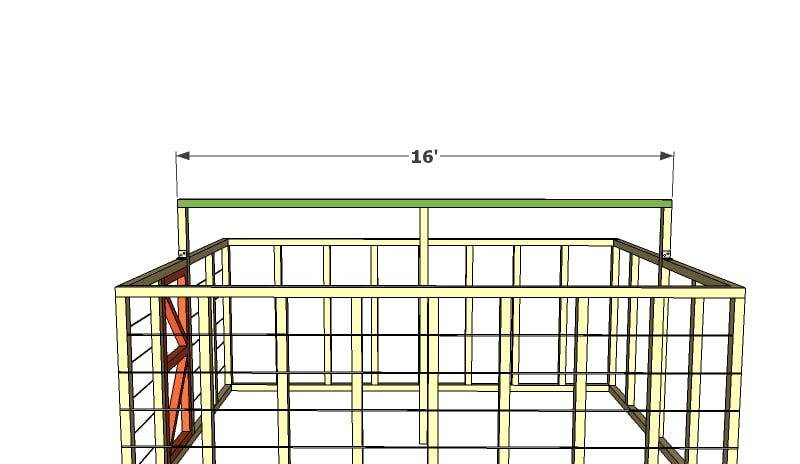
Top frame plans
Afterwards, you have to install the head plate over the timber studs, as in the image. Use long screws to fasten the rail to the wood studs (6” nails or screws), otherwise the fame of the greenhouse won’t be rigid enough.

Corner hardware
At the font and back of the greenhouse, secure the top rail with several corner brackets. Work with great care and with attention, otherwise the result might not rise to your expectations.

Wood joints for greenhouse frame
Even if this is a small projects, building a wooden greenhouse using our plans requires cutting the posts and joining them. Therefore, when fitting the bottom rail and the top plate, you should cut out segments from the wood studs and join them together with screws, as in the image.
We strongly recommend you to use this technique, if you want to enjoy your greenhouse for many years in a row.
Small greenhouse roof plans
Fitting the top ridge
Fit the 4×4 top ridge to the middle supports. Use corner connectors to lock the component into place.
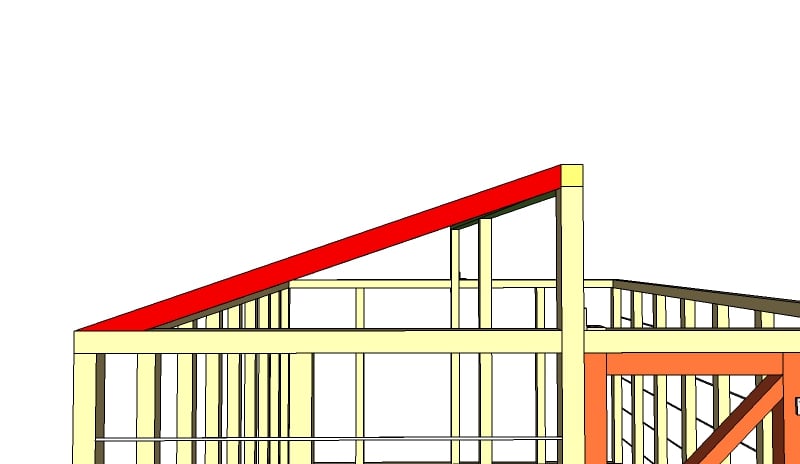
Building the rafters
After you install the ridge board, you have to cut the rafters and install them into place, by using nails or screws. As in the case of the side posts, you have to place the rafters equally spaced (24″ on center). In this manner, the roof will be rigid enough to support the foil and the heavy snow during the winters.
Work with great care and make sure the rafters are equally spaced at both ends. Although these aspects might seem unimportant, they make the difference between a successful project and a failure.

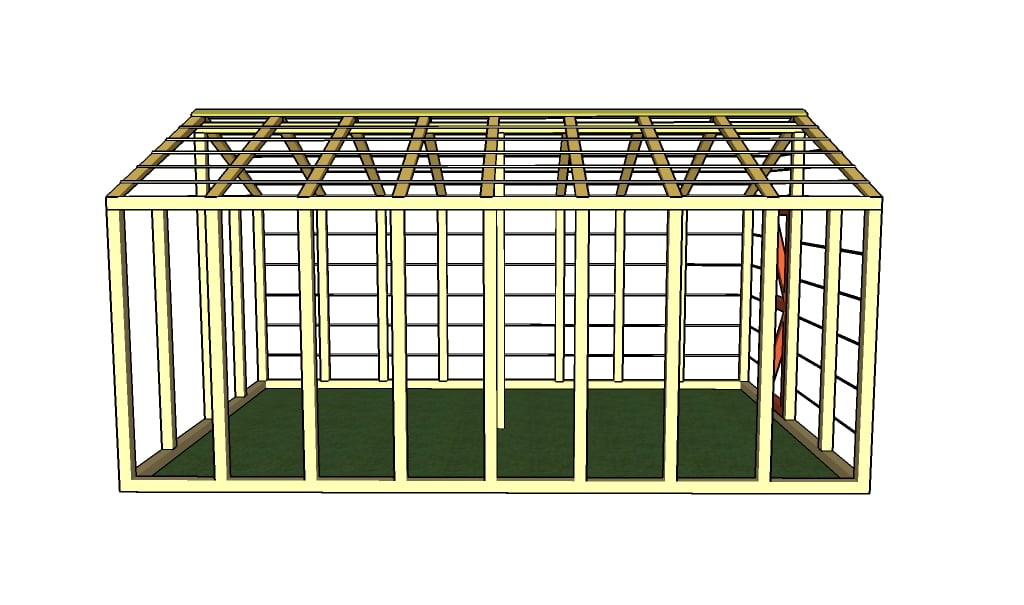
Mini greenhouse plans
Continue the project by installing the rest of the rafters, in the same manner described above. Work with great attention, making sure you secure them with nails at both ends.
If you have used our small greenhouse plans and followed our step by step instruction, your frame should look similar to the one in the image. All parts and components of the greenhouse should be aligned and secured properly.

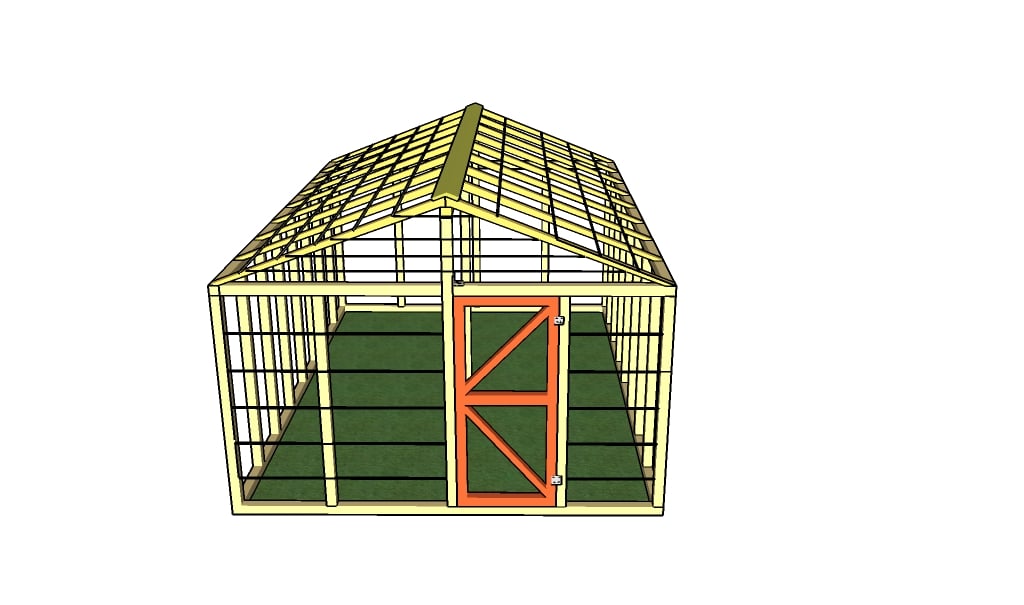
Greenhouse door plans
The entrance door is one of the main elements of a small greenhouse, therefore you should tackle this aspect with great care. Use 2×4 or 4×4 timber to build a rectangular structure, making sure it fits between the posts.
Install several hinges and a latch to make the door fully functional. Work with great care and use a spirit level when installing the door, otherwise it might not open properly.

Installing the plastic strips
Once you have installed the door into place, the small greenhouse is almost ready to use. Nevertheless, there are still several finishing touches left to do, before covering the greenhouse with the foil.
First, it is essential to install two 2×4 wooden boards on both sides of the peak, as in the image. If you skip this step, the polyethylene foil will be damaged by the sharp edges of the rafters.
DIY greenhouse plans
This is a sturdy greenhouse, so if you invest in weather resistant lumber, it will serve you for many years in a row.
Building a wooden greenhouse
The greenhouse seen from one side.

After you have built the frame of the greenhouse, you have to attach plastic strips or wire to the outside of the greenhouse, every 1′ / 30 cm, to support the polyethylene foil.
Use a tape measure to ensure the plastic strips are equally spaced and lock them into position with small nails. Afterwards, you should cover the whole structure with the foil and secure it with slats.

10×16 Greenhouse Plans
Check our latest greenhouse plans here. The new plans are more detailed and come with a cut list and step by step diagrams. This greenhouse is made entirely from 2×4 lumber, so that you can get the job done with common tools in just a weekend.
By following these tips, you’ll be able to build a sturdy and functional wooden gable greenhouse that enhances your gardening experience. Whether you’re growing vegetables, flowers, or tropical plants, a well-designed greenhouse will provide the perfect environment for year-round growth.
Thank you for reading our article about small greenhouse plans and we recommend you to check out the rest of our projects. Don’t forget to share our articles with your friends, by using the social media widgets. LIKE us on Facebook to be the first that gets our latest projects and to help us create more free plans for you.
5 comments
Hi – I’m looking to use the plan provided. Greatly appreciate the effort putting this online.
Point of clarification: You use the term “bottom rail” and “top plate” under wood joints but it is not clear what these refer to as the terms are not used anywhere else in the instructions.
Please can you clarify?
The plates are the horizontal beams. However, If you want to build a greenhouse I strongly recommend you to check out my other plans with are much more detailed and come with a cut list and step by step instructions. See my complete greenhouse plans at: http://howtospecialist.com/category/greenhouse/
Hi, Could you clarify what product to use for the “plastic straps” please. Do you buy it in lengths or rolls and is it any particular size. Thank you. Great plans.
Hello, i also dont undertstand what you are using for the plastic furring strips, i cant locate them, do you have a link for them? please and thank you
Gracias