This step by step diy article is about how to build a wood shed. Building a wood shed is one of those projects that pay off especially during the cold winters. This firewood storage shed can store up to 3/4 cords of wood. There are many designs and plans you could choose from, so you should take a look on the alternatives, before starting the actual constructions. If everything is planed from the very beginning and use proper materials, any diy-er can can build the basic shed in just a few days.
There are a few aspects you have to consider before building a woodshed. First of all, we recommend you to buy quality lumber (pressure-treated lumber or pine) and check if the slats are in a good condition. Generally speaking, the slats should not have knots, twists or other issues. Moreover, choose a proper location before building the wood shed. The area should be perfectly level and it should comply with the local building codes.
Remember that you should always pre-drill the components, otherwise the wood might split. In addition, check all the corners for squareness and make sure the corner posts are plumb, using a good spirit level. Align all the components at both ends, before inserting the galvanized screws into place, otherwise the end result might not fit your needs properly. Work with attention and with good judgement, if you want to prevent costly mistakes. See all my Premium Plans in the Shop.
Made from this plan
In order to make a woodshed, you needs the following:
Materials
- A – 2 pieces of 2×4 lumber 90” long, 7 pieces of 2×4 lumber 18” long JOISTS
- B – 5 pieces of 2×4 lumber 90” long FLOORING SLATS
- C – 2 pieces of 2×4 lumber 64 1/4” long, 2 pieces of 2×4 lumber 62” long FRONT LEGS
- D – 2 pieces of 2×4 lumber 51 3/4” long, 2 pieces of 2×4 lumber 51 1/4” long BACK RAFTERS
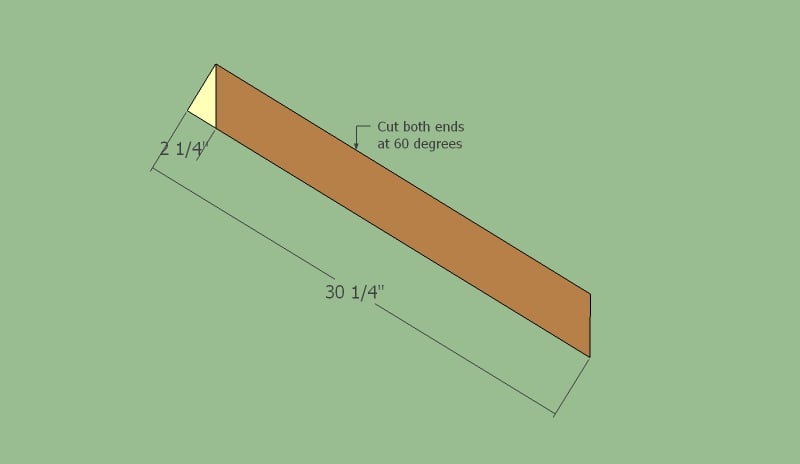
- E – 2 pieces of 2×6 lumber 96”, 2 pieces of 2×4 lumber 31 1/2”, 5 pieces of 2×4 lumber 30 1/4” RAFTERS
- F – 1 piece of 3/4” tongue and groove plywood, 30 3/4″ x 96” ROOFING
- G – 25 sq ft of tar paper ROOFING UNDERLAYMENT
- H – 25 sq ft of asphalt shingles SHINGLES
- I – 14 pieces of 2×4 lumber 25 1/2” long, 7 pieces of 2×4 lumber 93” lumber PANELS
Tools
- Safety gloves, glasses
- Miter saw, jigsaw
- Chalk line, tape measure, spirit level, carpentry pencil
- Drill machinery and drill bits
Tips
- Pre-drill holes in the wooden components, before driving in the screws
- Check the corners for squareness, using a corner square
Time
- One weekend
Related
Building a wood shed

Installing the legs
Building a small wood shed is a must-have especially when winter is knocking on the door. Apart from being a relatively easy project, as you don’t need many skills to get the job done, it also implies a small investment. In order to build the wood shed, you need to use pressure-treated lumber, as the components will resist against rot.
How to build a wood shed

Building the base of the wood shed
The first step of the project is to build the floor of the wood shed. Therefore, you should build the rim joists and the intermediate joists out of 2×4 lumber and assemble the frame with 3” screws. As you can see in the plans, you should drill pilot holes trough the rim joists before driving in the 3” galvanized screws.
Check the corners for squareness with a carpentry square, before inserting the screws.

Installing the flooring slats
Next, you should attach the flooring slats. In order to dry the firewood properly, we recommend you to use 2×4 lumber and to leave about 1” between the slats. In this manner, the air circulation will keep the firewood in a good condition.

Installing the legs
After assembling the floor of the construction, you should attach the corner legs. In order to get the job done quickly and to get a professional result, we recommend you to build each corner leg from two 2×4 slats. As you can see in the image, you need to plumb the posts and to attach them to the frame with 2 1/2” lag screws. Countersink the head of the screws before inserting them into place.
Leave 4” between the ground and the frame floor.
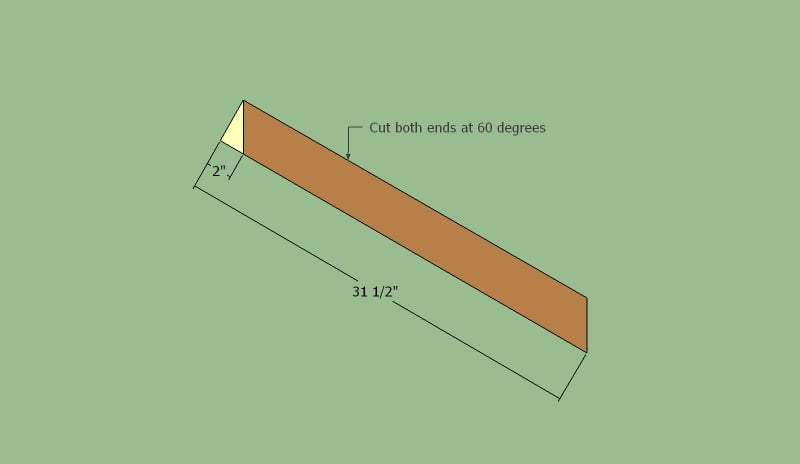
Building the side rafters
Build the side rafters from 2×4 lumber. Cut both ends at 60 degrees.

Fitting the rim rafters
The next step of the woodworking project is to fit the rim rafters. As you can see in the image, you need cut the ends of the side rafters at 60º (use 2×4 lumber), as to have a proper access to the interior of the shed, as well as to drain the water properly. Use a spirit level to check if the front and the back rafters (use 2×4 lumber) are perfectly horizontal.
Drill pilot holes at both ends of the components and drive in 2 1/2” wood screws to secure them into place.
How to build the rafters
Build the rest of the rafters (intermediate rafters) out of 2×4 lumber, cutting their both ends at 60º.

Installing the rafters
Place the rafters as in the image, leaving the right space between them, and secure them to the rim rafters with 2 1/2” wood screws. Drill pilot holes trough the rim rafters before driving in the galvanized wood screws into the end of the rafters.
Aligned the rafters at both ends, otherwise you won’t be able to fit the roofing sheets.

Installing the roofing sheets
The next step of this diy project is to fit the roofing sheets. In order to obtain a professional result, we recommend you to use 3/4” tongue and groove plywood sheets. Fit the sheets into place and lock them to the rafters with 1 1/2” screws, every 6”. Make sure there are no gaps between the sheets.

Fitting the roofing
Cover the roof with tar paper, making sure the strips overlap 2”. Use staples to secure the roofing underlayment to the 3/4” plywood. Fit the back and drip edge under the roofing felt, while the side drip edges should be installed over the felt.
Install the shingles starting with the bottom of the roof. First, install the starting course with the tabs upward-oriented. continue the installation by fitting the tabs and securing them into place with staples.

Attaching the exterior slats
Attaching the side and back walls is optional, but it will most likely not only improve the look of the shed, but also protect the firewood from heavy rain or snow. As you can see in the image, you need to build the panels out of 2×4 lumber. Align the slats at both ends, drill pilot holes and secure the components into place with 2 1/2” decking screws.
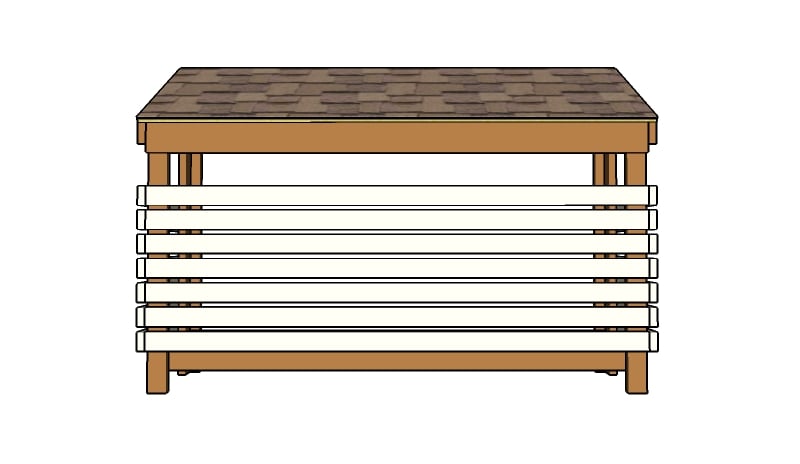
Firewood Storage Shed – Back view
This lean to wood storage shed is a sturdy construction, so it can resist and serve you for many years in a row.
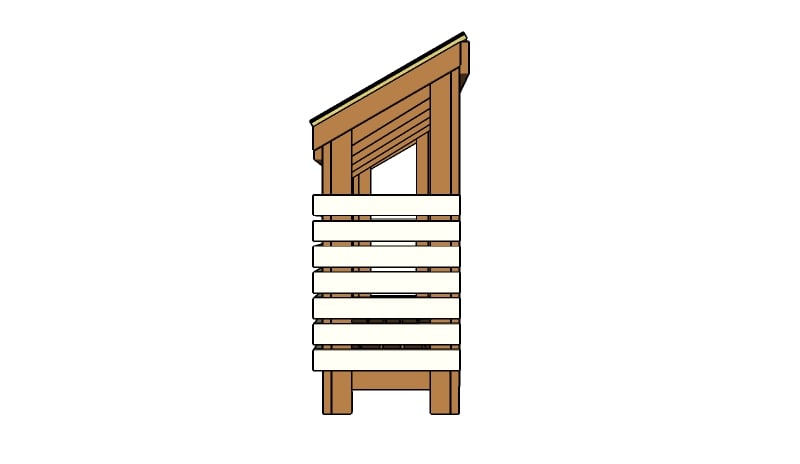
Wood storage shed – Side View
This shed is narrow enough to fit any space, making it the right choice if you want to store a small quantity of firewood. Keeping the wood dried is essential, as they will burn faster and give you more heat.
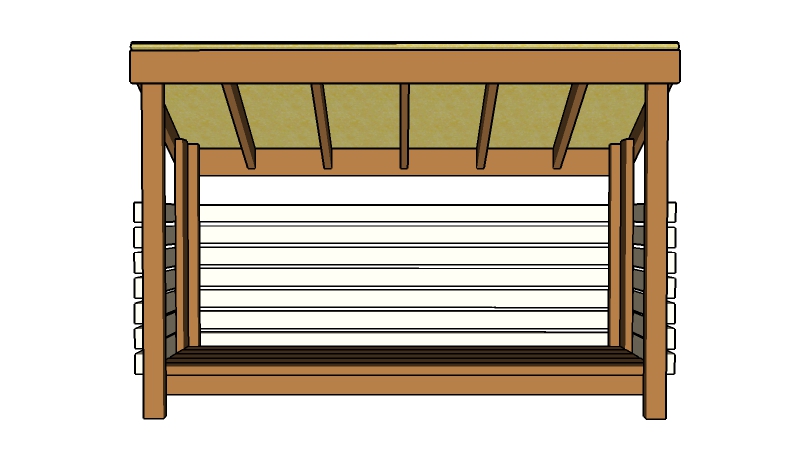
Log shed – Front View
The log shed seen from the front. As you can see it has a neat modern design, so you can place it near your house without damaging the style of your property.

How to build a wood shed
Lastly, take care of the final touches. First, fill the holes with wood putty and afterwards to sand the wooden surface with medium-grit sandpaper. Make are the shingles drain the water properly and fill any gaps with silicone.

Thank you for reading our article about how to build a wood shed and we recommend you to check out the rest of our projects. Don’t forget to share our projects with your friends, by using the social media widgets, if you have found them useful and to help us create more free plans.
16 comments
I’m just wondering how many cords this woodshed holds?
One cord of wood measure 4x4x8. The shed is slightly smaller than that, so you have about 3/4″ of a chord.
Based on the measurements given by the author, this shed holds 0.42 cords. A cord (in inches) is 48 x 48 x 96. This shed, inside useable measurements are, height (average since roof is sloped) 48.5 inches, depth 21.5, width 90.
Just wondering why you need tongue and groove plywood instead of standard plywood?
It’s optional. You can get by with regular ply as well.
I read somewhere in the article it costs $40? Bahaha…
Whats the real cost?
Where have you seen 40 bucks estimated costs? It’s about 300 bucks.
I spent about $140 and used leftover shingles and pine planks. I’m guessing $200 for untreated, lots more for treated.
Jack, this website links this page and lists the estimated cost at $40.
https://howtospecialist.com/give-back/diy-firewood-shed/
“That” site is this site. That’s a project built by a reader. He probably recycled some lumber or something, and saved some money. That would explain the low cost.
60 degrees or 45 degree for the side rafters? It says 60 degrees in the text but 45 in the drawing….
Make 30 degree cuts to the rafters. Once you’re done, the rafter ends will be 60 degree.
The materials list has 17 pieces of 2×4 lumber – 8′ which is 1,632 inches. When you add up all the lengths of wood provided in the details above you get about 2,425 inches. Am I missing something? Seems like you need more than 17 pieces of 2×4 lumber.
True, I’ve updated the list.
Curious if folks have tried using thinner lumber for the slats? I built a simple platform (no roof) and used all 2x4s. Having the slats that large was def overkill, but in this plan do you need more structural support?
Was this done with framing lumber or pressure treated for the slats? If it was with framing lumber, how has it held up to weather?