This diy step by step article is about wooden carport plans. In this project we show you how to build a lean to carport, using straight forward woodworking techniques and cheap materials. Moreover, the great advantage of the plans is that you are able to customize its appearance to fit with the design of your house and with rest of your yard, while using the same basic carpentry techniques. If you are looking for a simple construction to protect your car from bad weather, but you don’t want to invest in a fancy garage, then you should pay attention to our diy guide.
After you have built the main structure of the carport, you have to install the roofing surface. Therefore you should decide between several alternatives,: on one hand you could install 3/4” plywood sheets, tar paper and asphalt shingles, while on the other hand you could go for a simpler and cheaper solution – PVC or metal roofing sheets. As we have pointed out, each of these methods have their own pros and cons, therefore take the decision based on your budget and needs.
Before building the carport, you should plan thoroughly every aspect of your project. Therefore, you should take into consideration the height of the finished concrete slab, before setting the posts into concrete or before installing the metal anchors into place. Measure the posts attentively, making sure their top is at the same level, otherwise you won’t be able to build the roof of the carport. If the land is not level, you have to take into consideration the differences when planning the construction. See all my Premium Plans in the Shop.
Made from this plan
Wooden Carport Plans

Wooden carport plans
Materials
- A – 6 tube forms and concrete FOOTINGS
- B – 6 adjustable post anchors POST ANCHORS
- C – 3 pieces of 4×4 lumber 84” long SHORT POSTS
- D – 3 pieces of 4×4 lumber 116” LONG POSTS
- E – 2 pieces of 2×6 or 2×8 lumber 20′ long BEAMS
- F – 2 pieces of 2×6 or 2×8 lumber 127 1/8” long (15º cuts at both ends) END RAFTERS
- G – 9 pieces of 2×4 lumber 124 1/4” long (15º cuts at both ends) RAFTERS
- H – 10 pieces of 2×4 lumber 22 1/2” long BLOCKING
- I – 8 pieces of 2×4 lumber 15” long (45º at both hands) BRACES
- J – 220 sq ft of 3/4 plywood ROOFING SHEETS
- K – 220 sq ft of tar paper ROOF UNDERLAYMENT
- L – 220 sq ft of asphalt shingles ASPHALT SHINGLES
- M – 2×2 lumber LATTICE
- N – 4” wood screws SCREWS
Tools
- Safety gloves, glasses, Miter saw, jigsaw
- Chalk line, tape measure, spirit level, carpentry pencil
- Drill machinery and drill bits, Router, 1/4” round bit – optional
- Power mixer, ladder, Wheelbarrow, shovel, post digger
Tips
- Lay out the carport properly, using batter boards and string
- Pre-drill holes in the wooden components, before driving in the screws
- Align the components before locking them into place with screws
- Don’t use lumber that is likely to crack or shrink
Time
- One weekend
Related
My best tips on building a lean to carport:
A lean-to carport is an excellent option for protecting your vehicle from the elements while being a straightforward DIY project. With a sloped roof that attaches to an existing structure, it’s both functional and space-saving. Here are my best tips for building a sturdy and effective lean-to carport.
1. Plan Your Carport Design
Before starting, carefully plan the design and layout:
- Size: Measure the space needed to comfortably park your vehicle. Common sizes for a carport are 10×20 feet for a single vehicle or 20×20 feet for two vehicles. Ensure there’s enough headroom for taller vehicles.
- Roof pitch: A lean-to roof is sloped from one side to the other, allowing water and debris to drain off easily. A 4:12 pitch (4 inches of rise for every 12 inches of run) is a good minimum to ensure proper drainage.
- Materials: Use pressure-treated wood for the frame, or opt for metal posts for added durability. Choose a corrugated metal roof or polycarbonate panels for weather resistance.
Planning the size and materials ensures the carport meets your needs and fits into your available space.
2. Check Local Building Codes
Before building, check with your local municipality for any required permits or building codes:
- Permits: In many areas, you may need a permit to build a carport, especially if it’s attached to an existing structure like your house.
- Setbacks: Ensure that the carport meets setback requirements, which dictate how far it must be from property lines or other structures.
- Height restrictions: Check for height restrictions to ensure your carport complies with local regulations.
Following local codes ensures your project is legal and safe.
3. Prepare a Solid Foundation
A strong foundation is key to a stable and long-lasting carport:
- Concrete footings: For the support posts, dig holes 18-24 inches deep and fill them with concrete. This provides a strong, stable base for the posts.
- Gravel or pavers: If you don’t want to pour a concrete slab for the entire area, you can lay gravel or pavers to create a level parking surface with proper drainage.
A solid foundation ensures your carport remains stable and secure over time.
4. Build the Frame
The frame provides the structural support for the roof:
- Install posts: Use 4×4 or 6×6 pressure-treated posts for the support beams. Set them in the concrete footings and make sure they are plumb and level.
- Attach the header: Attach a 2×6 or 2×8 header to the posts along the side that will be attached to the existing structure (e.g., house or garage). Secure it to the house using lag bolts.
- Install the beams and rafters: Run beams across the posts to support the rafters. Install rafters spaced 16-24 inches apart to provide adequate support for the roof.
Building a strong frame ensures your carport can support the roof and withstand the elements.
5. Install the Roof
The roof is the most important part of the carport, protecting your vehicle from the weather:
- Install roof sheathing: Cover the rafters with plywood or OSB sheathing, making sure to extend the edges slightly beyond the frame to allow for rain runoff.
- Add roofing material: Install corrugated metal sheets, shingles, or polycarbonate panels. Make sure to overlap each row of roofing material to prevent leaks.
- Add flashing: Use metal flashing along the edges where the roof meets the house to prevent water from seeping into the structure.
A well-installed roof ensures that your carport provides protection from rain, snow, and sun.
6. Add Finishing Touches
Once the main structure is complete, focus on the details to make it more functional:
- Gutters: Install gutters and downspouts along the roof to direct water away from the carport and prevent pooling.
- Lighting: Add outdoor-rated lights or motion-sensor lighting to increase visibility at night.
- Storage: Consider adding built-in shelves or hooks along the sides of the carport for extra storage, such as tools or outdoor equipment.
Finishing touches improve the functionality and convenience of your carport.
Bonus Tip: Customize Your Carport You can customize your carport by adding privacy walls on one or more sides, or by extending it to cover additional outdoor space for seating or storage.
How to build a lean to carport

Laying out the carport
Firstly, you have to lay the wooden carport in a professional manner, using batter boards and string. After you set the batter boards, you have to check the corners for squareness. Therefore, make sure the diagonals are equal and apply the 3-4-5 rule on every corner.

Anchoring the post into concrete
After you have dug the holes (2-3′ deep, 12” in diameter) you should decide the anchoring system. If you want to set the post into concrete, the whole structure will gain more rigidity as compared to using adjustable anchors.
Compact 2” of gravel on the bottom of the holes, set the tube forms and pour a 4” layer of concrete. Set the posts into place, plumb them with a spirit level and lock them with two 2×4 braces.

Installing the posts
If you prefer to set the 4×4 posts using adjustable anchors, the procedure is straight forward. After you have filled the forms with concrete, you have to set the metal anchors, making sure they are perfectly aligned one with another (use string as guidance lines).
Let the concrete to dry out for 72 hours, plumb the posts with a level and hold them in place with braces, before inserting the lag screws.

Building the frame of the carport
Next, you have to attach the 2×6 (you can use 2×8 lumber, as well) beams to the posts, as in the image. If you have installed the posts properly, the beams should be perfectly horizontal (use a spirit level to check its level).

Building the rafters for carport
Build the rafters for the carport from 2×4 lumber, using the information from the diagram.

Lean to carport roof plans
Afterwards, you have to build the end rafters and install them into place with 4” screws. Our plans are about a lean to carport with 15 degrees roof pitch, in order to drain the water properly. Therefore, you have to cut the ends of the rafters at 15º.
The 2×4 rafters should be equally spaced, therefore make sure you place them every 24” OC. Place a 22 1/2” board between the rafters, to obtain consistent gaps, at both ends.

Securing the rafters with corner brackets
Setting the rafters properly is important for the rigidity of the construction, therefore you have to use the right methods. On one hand, you should drive in 3” screws trough the beams in the rafters, ensuring they are aligned properly and plumb.
In addition, use corner brackets or joist hangers to secure the rafters at both hands. Drive in the appropriate screws, and make sure you don’t over-tighten them.

Building the roof of the carport
Before installing the roofing sheets, you have to install the 2×4 blockings between the rafters. As you can see in the image, you have to position them on the middle of the rafters and secure with 3” screws inserted trough the rafters.
Install 3/4 plywood sheets (nail them every 10” along the rafters), tar paper and fit the drain caps along the edges of the roof. Install the asphalt shingles, ensuring they overhang 1/2” on all sides.
Wood Carport Plans
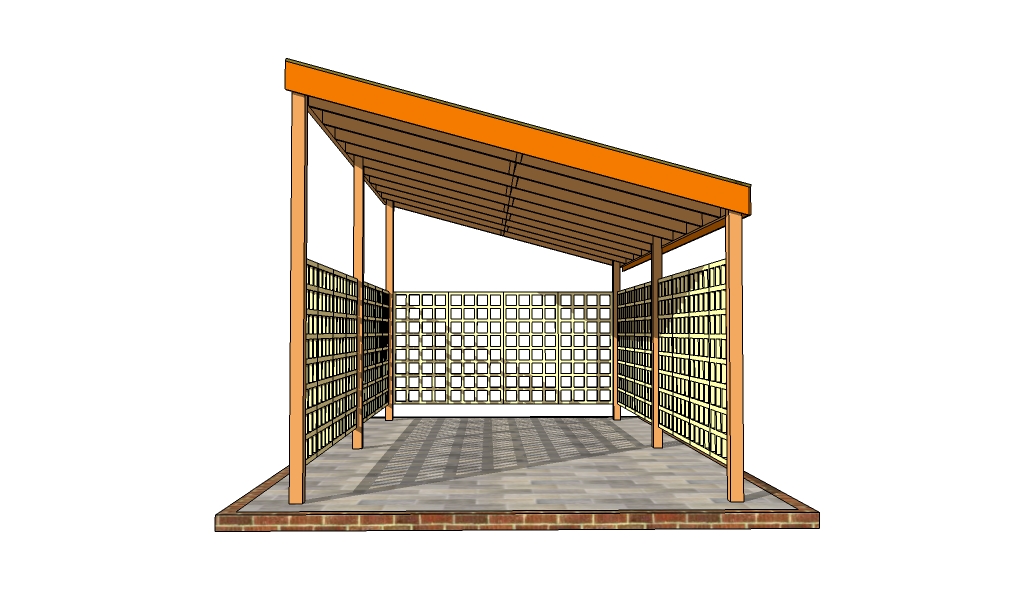
You can place privacy panels between the posts, if you want to enhance the look of the carport and to better protect your car from the elements.
Building a single car carport
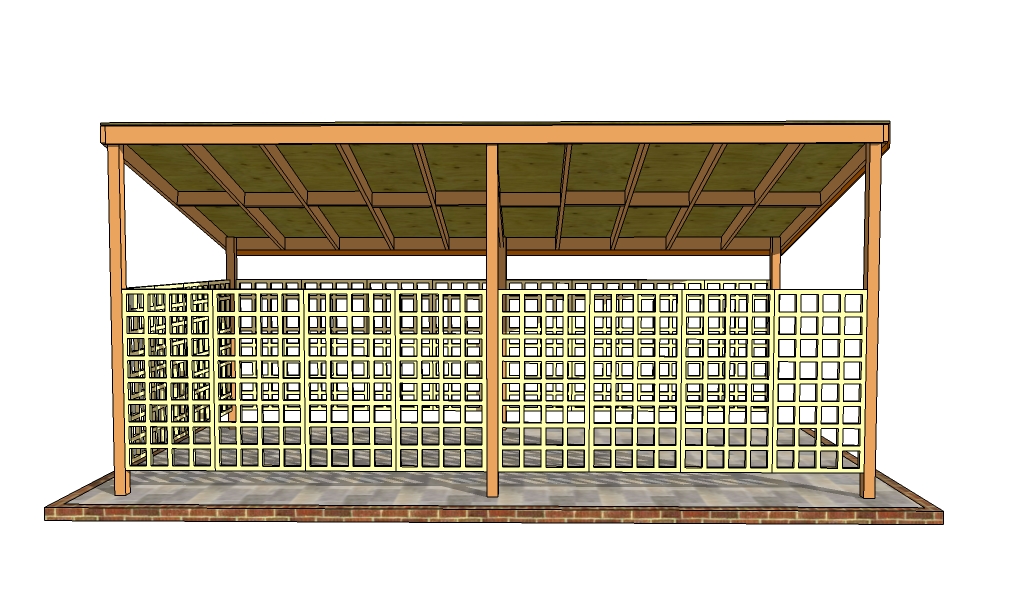
The carport seen from the front has a nice appearance and a neat design. Make sure you take care of the finishing touches. In addition, take a look over the rest of the carport plans, for more building ideas.

Wooden Carport Plans Free
If you want some privacy or an unique design, you should install lattice on both sides of the wooden carport, just between the wooden posts. In addition, you have to fit lattice on the back face of the carport. If you have used posts anchors, you should also install 2×4 braces to secure the posts to the beams. Cut the ends of the braces at 45º and lock them with galvanized screws.

By following these tips, you’ll be able to build a durable and attractive lean-to carport that provides excellent protection for your vehicle. With careful planning and attention to detail, your DIY carport will serve you well for years to come.
Thank you for reading our article about wooden carport plans free and we recommend you to check out the rest of our projects. Don’t forget to share our articles with your friends, by using the social media widgets.
1 comment
Hi, do you have a carport that I could put my Renault Master in?
It is a one that has been built for me as I have MS. As it won’t fit in my standard garage I would need it to fit in front of it.
My garage is a two car one.
Looking forward to hearing from you soon.