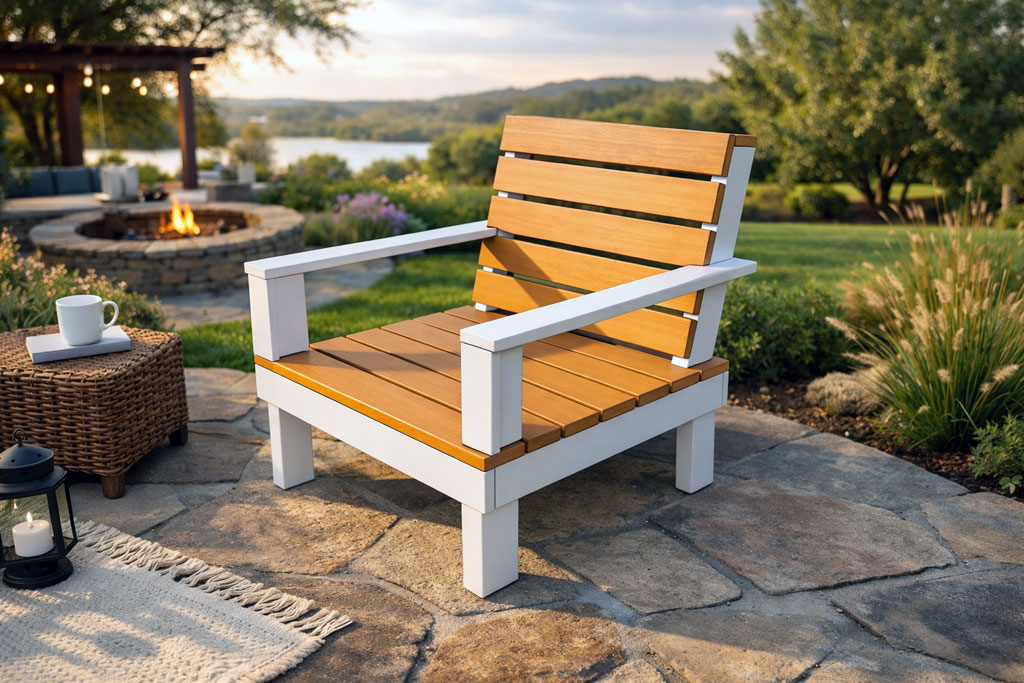
This diy step by step article is about outdoor chair plans. In this guide we show show you how to build a lawn chair, using common materials and basic carpentry skills. If you will follow our tips, select the materials with great care and measure the components properly, you will enhance the look of your garden and relax during the summer afternoons. In addition, if you place the wooden chair on a large shaded area, you could enjoy reading a good book and drink a cold lemonade. The quality of the lumber has a direct effect on the appearance of your chair, therefore make sure the lumber is in a good shape, without cracks or chips.
If you want to obtain a professional appearance, you should countersink the screw heads using the appropriate bit. After you install the components into place and lock them with screws, you should fill the holes with wood putty and let it harden for a day. Afterwards, use 120-grit sandpaper and smooth the surface along the wood grain, till you obtain a neat surface. If you use these basic techniques, you should get the job done properly.
Measure the lumber several times before before drawing the cut lines, otherwise the wooden components might not fit together. In addition, we recommend you to plumb the elements before driving in the screws, and ensure the seat is level. When inserting the nails, you should leave at least 1/2” from the edges, to prevent the wood from splitting. If you want to obtain a nice appearance, insert the screws symmetrically. See all my Premium Plans in the Shop.
Made from this plan
In order to build an outdoor chair plans, you need the following:
Materials
- A – 2 pieces of 2×4 lumber 22” long FRONT LEGS
- B – 2 pieces of 2×10 lumber 35″ long BACK LEGS
- C – 2 pieces of 2×4 lumber 29” long SIDE APRONS
- D – 8 carriage bolts 3 1/2” long CARRIAGE BOLTS
- E – 2 pieces of 1×4 lumber 31” long FRONT AND BACK APRONS
- F – 8 pieces of wood screws 2” long WOOD SCREWS
- G – 4 pieces of 2×4 lumber 2” long BLOCKS
- H – 8 pieces of 1×4 lumber 31′ long SEAT BOARDS
- I – 2” screws SCREWS FOR SEAT
- J – 6 pieces of 1×4 lumber 28” long BACK SUPPORT BOARDS
- K –2 pieces of 1×4 lumber 32” long ARM RESTS
- L – 2 pieces of 1×3 lumber 8 1/4” long TRIMS
- 2 pieces of 2×4 lumber – 8 ft
- 1 piece of 3×20 lumber – 6 ft
- 8 carriage bolts 3 1/2” long
- 7 pieces of 1×4 lumber – 8 ft
- 1 piece of 1×3 lumber – 2 ft
- 2 1/2″ screws
- 1 1/4″ screws
- glue, stain
- wood filler
Tools
- Safety gloves, glasses
- Miter saw, jig saw
- Chalk line, tape measure, spirit level, carpentry pencil
- Drill machinery and drill bits
- Router and 1/4 bit
Tips
- Smooth the edges of the wooden boards, with a router
- Pre-drill holes in the wooden components, before driving in the screws
- Countersink the head of the screws
- Align the components before locking them into place
- Don’t use lumber that is likely to crack or shrink
- Don’t over-tighten the screws to prevent the wood from splitting
Time
- One day
Related
Outdoor Chair Plans

Patio chair plans
Building a garden chair is a straight forward job, if you use the right plans for your needs and the right woodworking techniques. An outdoor chair doesn’t have to be expensive, therefore you can build a durable piece of furniture by yourself, in only one day, just by cutting a few boards of lumber and locking them together.
How to build a lawn chair

Building the legs of the chair
First, build the front and the back legs of the lawn chair. While building the front leg is a straight forward job, as you just need to cut a 2×4 board, the back leg is a little more complex. The easiest method to build the back leg is to cut it out from a 2×10 beam.
If you want to build a lawn chair for your kids, you could adjust the dimensions, while using the techniques and methods described in this tutorial.
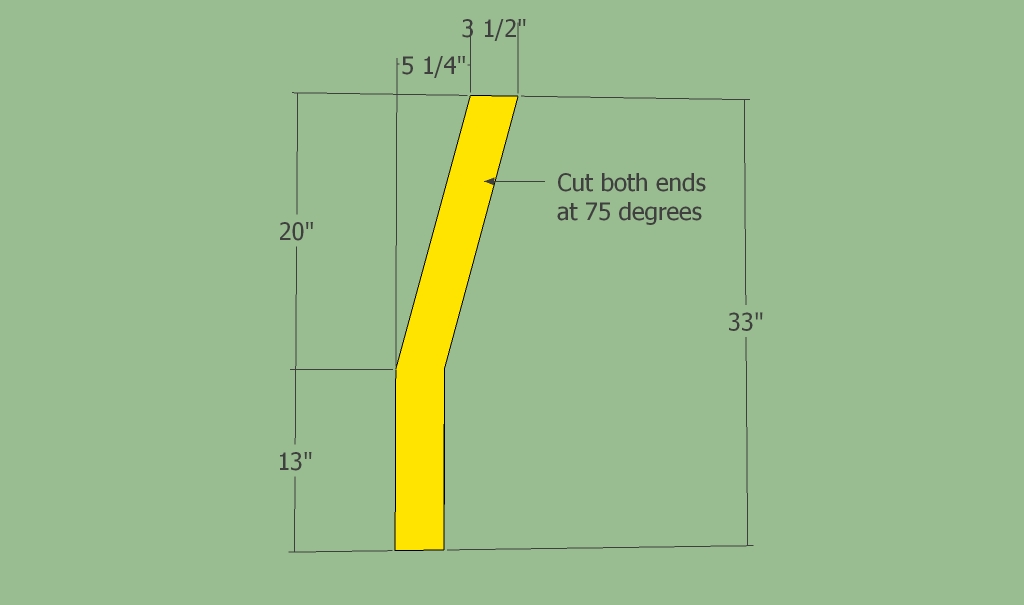
Building the back leg
Use a pencil and a straight line to draw the outline of the back leg. Continue the process by cutting out the wooden component, using a jigsaw. Work with great care and attention, ensuring the blade of the saw is sharp and it goes exactly over the cut line.

Installing the braces
Next, you have to build 2×4 (you could use 1×4 lumber, as well) braces and lock the front and the back legs together tightly. The dimension of the braces will influence the size of the seat, therefore make sure it fits you needs perfectly.
Use several C-clamps to lock the components, ensuring the braces are level. Drill several pilot holes trough the braces and the legs, install the 3 1/2” carriage bolts and tighten the nuts.

How to build an outdoor chair
Continue the woodworking project by installing the front and the back aprons, made from 1×4 lumber. Secure the wooden components to the legs with 2” screws, after you have pre-drilled several holes with a drill machinery.
Don’t forget to countersink the heads of the screws, otherwise you won’t be able to obtain a smooth appearance. Use a spirit level to make sure the seat is level and check the corners for squareness.

Installing the seat boards
Installing the 1×4 boards into place is a straight forward job, if you have followed the previous steps. You might face some issues when installing the slats around the legs of the outdoor chair, if you don’t take accurate measurements.
Use a jigsaw to cut the notches, before installing the wooden boards into place. Drill holes at both ends of the slats and install them into place with 2 wood screws.

Building the back support of the chair
Afterwards, you should install the back support of the chair, using the same materials and techniques, as in the case of the seat. Work with attention, making sure you align the slats at both ends, before locking them with two 2” screws, at both ends.

Arm Support Plans
Installing the arm rests and the trims is a straight forward job, as you have to build the wooden components from 1×4 lumber and drive in several 2” screws, to lock them into place. Don’t forget to countersink the head of the screws.

Outdoor chair plans
Fill the screw holes with a water resistant wood putty and let it dry out for at least one day. Afterwards, use a sand block and 120-grit sandpaper, in order to smooth the surface, moving it along the wood grain.
After the wooden surface of the lawn chair is smooth enough, we recommend you to apply several coats of varnish or paint, to protect the lumber from wood decay or water damage.
Thank you for reading our article about free outdoor chair plans and we recommend you to check out the rest of our projects. Don’t forget to LIKE and SHARE our articles with your friends, by using the social media widgets.
4 comments
Great plan, planning to make a pair of it. However I think you forgot the back legs (B) long measure, at least I have not yet found it. Is it 35¨, 22¨+13¨ ?
thanks for pointing that out. I hope things are more clear now.
Can you tell me if there is soft ware available to draw a chair. I have a chair I want to copy, I have all the measurements but it is difficult to draw it on paper.
I hope you can help.
Linda
Please read the FAQs: http://howtospecialist.com/faq/