
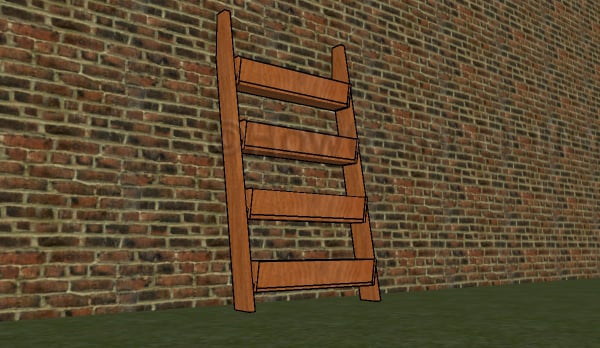
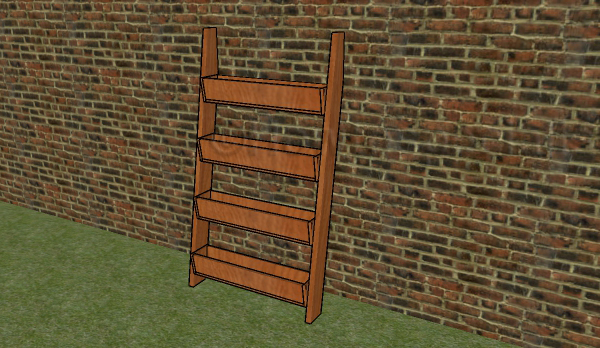
This step by step woodworking project is about free tiered planter plans. I have designed the vertical planters so you can build the unit under 20 dollars. Just make all the cuts and then assemble the tiered planters using the instructions described in the diagram. Make sure you buy 1×6 cedar slats so the planters resist against the elements on the long run. Work with attention and adjust the size of the planters to suit your needs. Make sure you check out my top projects, for a healthy dose of building inspiration.
We recommend you to invest in the best materials you could afford. Therefore, you should buy quality lumber, such as pine, cedar or redwood. Always take accurate measurements before adjusting the size of the components at the proper size. Drill pilot holes trough the components before inserting the wood screws, to prevent the wood from splitting. See all my Premium Plans in the Shop.
Made from this plan
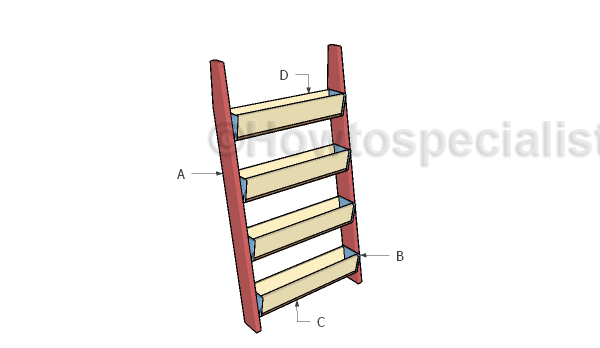
Building a tiered planter
Materials
- A – 2 pieces of 2×6 lumber – 72″ long LEGS
- B – 8 pieces of 1×8 lumber – 7 1/2″ long SIDES
- C – 4 piece of 1×6 lumber – 34 1/2″ long BOTTOMS
- D – 8 pieces of 1×6 lumber – 34 1/2″ long FACES
- 2 pieces of 2×6 lumber – 6′
- 1 pieces of 1×8 lumber – 8′
- 6 piece of 1×6 lumber – 6′
- 200 pieces 2″ brad nails
- wood glue
- stain, spar varnish
- wood filler
Tools
- Safety gloves, glasses
- Miter saw, jigsaw
- Chalk line, tape measure, spirit level, carpentry pencil
- Drill machinery and drill bits
Time
- One Day
Tiered Planter Plans
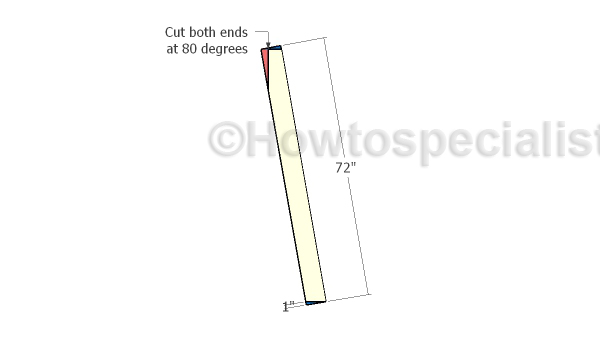
Building the vertical supports
Build the sides from 2×6 lumber. Cut both ends of the supports at 80 degrees (make 10 degree cuts). Smooth the edges with sandpaper for a professional result.
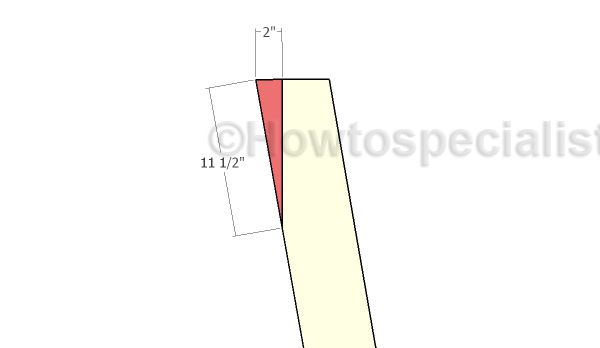
Making the top cut to the supports
Make a cut to the top of the supports, so you can lean the tiered planters to the wall. Mark the cut lines and get the job done with a saw. Smooth the edges with sandpaper and remove the excess with a damp cloth.
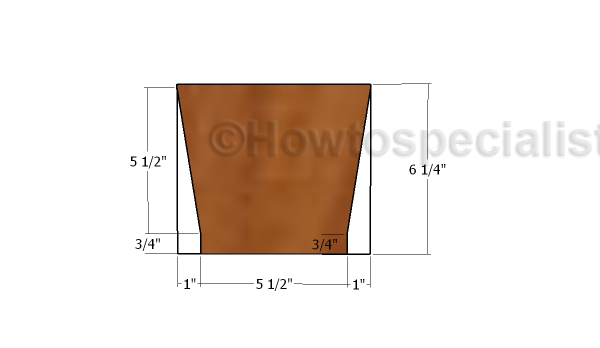
Building the sides of the planter
After building the side supports, you have to make the planter. Therefore, start with the sides of the planters. Mark the cut lines on a 1×8 slat and get the job done with a saw. Smooth the edges thoroughly. I really recommend you buying cedar or redwood for the planters, as they will be exposed to moisture.
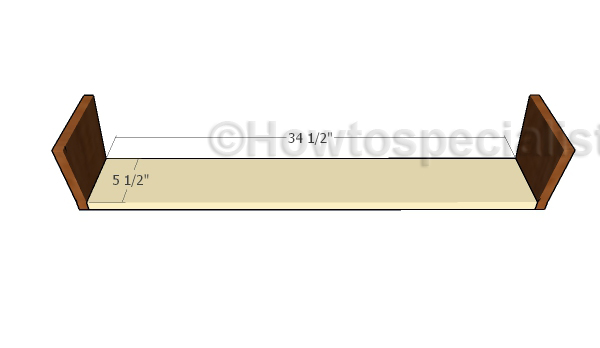
Attaching the back
Next, attach the 1×6 bottom to the sides of the planter. Use 2″ brad nails to secure the sides to the bottom. Add waterproof glue to the joints for a professional result.
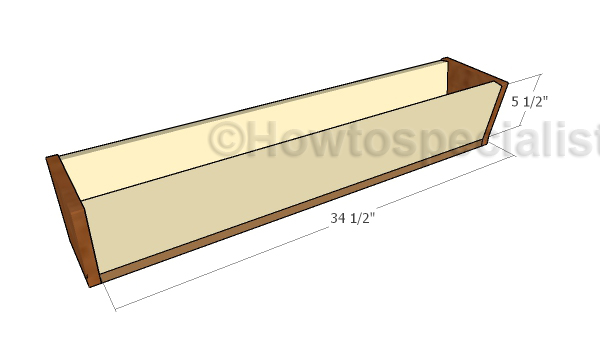
Assembling the planters
Continue the project by attaching 1×6 slats to the front and back of the planters. Align the edges with attention and add glue to the joints. Insert 2″ brad nails through the sides into the faces. Insert screws through the bottom into the front and back slats. Leave no gaps between the components for a professional result.
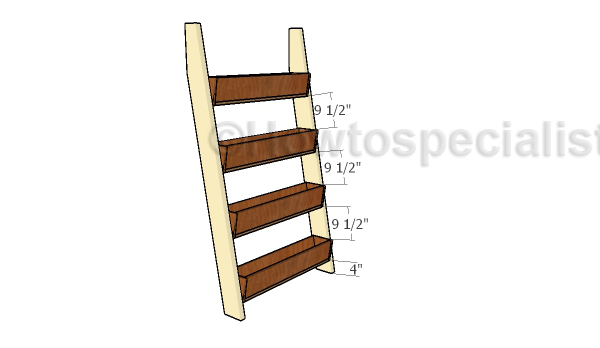
Attaching the planters
After building the planters, it is just a question of attaching them to the side beams. Make sure you place the planters equally spaced and insert 2″ nails through the sides into the vertical supports.
Tiered planter plans
After assembling the vertical tiered planters, you just have to fill the holes with putty and smooth the surface with sandpaper, after it dries out. Fill the planters with flower soil and choose a location for your new project, so it gets enough sunlight daily.
You can make several units and join them together, if you want to cover a wall or to make a green partition in your backyard.
Vertical tiered planter plans HTS

Thank you for reading our project about free vertical tiered planter plans and we recommend you to check out the rest of the projects. Don’t forget to LIKE and SHARE our projects with your friends, by using the social media widgets. SUBSCRIBE to be the first that gets our latest projects.

Don’t know when these plans were developed but this can’t be built for under $20 in May 2020.
Total Cost of Lumber at Home Depot is $51.63 plus tax using pressure treated ground contact lumber.
Cedar starts at $17 for one board, 1x6x8ft.
Costs go up as one purchases glue, wood filler, nails, screws, paint or stain, etc.
There are some errors in these plans: 1) Materials for A is 2 pieces not 6, 2) attaching planter’s bottom to front & back nor the use of pocket screws are ever mentioned, 3) spelling errors, etc.
The plans are useful after getting passed these issues.
Thank you for the feedback. Updated the cut list. The estimate was done considering the use of regular pine. Investing in pressure treated lumber or cedar will certainly push the costs up.