This step by step garden project is about how to build a lean to greenhouse. Building a lean to greenhouse will help you grow vegetables and flowers in your own garden. Gardening is one of the best choices if you need a hobby or you just want to relax and reduce the stress level. Attaching the greenhouse to your house is an option, but you need to make sure the moisture won’t damage the structure of your home.
A lean to greenhouse is the ideal project for you, if you want to grow vegetables and flowers by yourself, but you don’t have enough space in your backyard. Don’t forget that you should pay attention to the preliminary steps, such as reading the building codes and get a permit, if needed. In addition, we recommend you to invest in quality materials that are resistant to moisture and sunlight.
Always adjust the size of the lean-to greenhouse to your needs before starting the actual construction. In addition, use a circular saw with a sharp blade to cut the components at the right size before assembling the frame together. Always align the components at both ends and drill pilot holes before inserting the screws to get the job done as a professional. Plumb the studs with a spirit level and check if the corners are right-angled, by using a carpentry square. See all my Premium Plans in the Shop.
Made from this plan
Building a lean-to greenhouse

Building a lean to greenhouse
Materials
Tools
- Safety gloves, glasses
- Miter saw, jigsaw
- Chalk line, tape measure, spirit level, carpentry pencil
- Drill machinery and drill bits
Tips
- Build a loft to increase the storage space
- Secure the walls temporarily with braces
Time
- One Week
Related
How to build a lean to greenhouse

Building the side wall
The first step of the project is to build the frame of the lean to greenhouse. In order to get the job done as a professional, we recommend you to assemble the walls on a level surface. In addition, check if the corners are right-angled and drill pilot holes trough the plates, before inserting the 3 1/2″ screws into the studs.

Building the tall side wall
Build the opposite wall in the same manner described above. The only difference is that we recommend you to cut the top of the studs at about 20º, before attaching the top plate. In this manner, it will be a lot easier when fitting the rafters into place and you will reduce the amount of work needed. Place the studs every 24″ on center, in order to provide enough support to the structure.

Assembling the frame
Place the side walls on the chosen location and plumb them with a spirit level. Use wooden braces to lock the walls into place, before building the front and the back faces of the greenhouse. In addition, you could place the frames on top of 4×4 skids, as to protect them from moisture.

Front wall plans
Building the front face of the greenhouse is a straight-forward job, as you just need to attach studs to the bottom plate, after placing it between the sides of the construction. Plumb all the studs with a spirit level before fitting them into place. Leave enough space for a large door, otherwise you won’t have an easy access to the greenhouse.

Back wall plans
Build the back wall of the greenhouse in the same manner described above. The only difference is that you don’t have to leave space for a wooden door. On the contrary, we recommend you to place the studs every 24″ OC and to lock them to the plates, as tightly as possible. Check if the corners are right-angled, after fitting each component. Make 20 degree cuts to the top of the top studs.

Attaching the rafters
Build the rafters from 2×4 lumber and lock them into place with 3 1/2″ galvanized screws. Cut the ends of the rafters as in the image, if you want to get the job done as a professional. Double the rafters at both ends of the greenhouse, in order to add support to the structure.
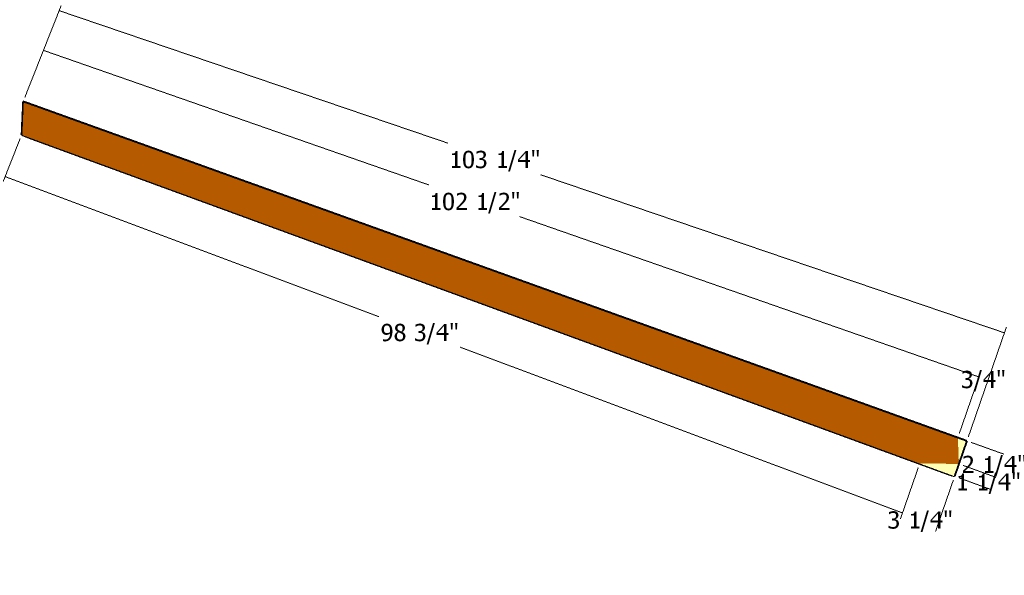
Building the rafters
Use the information from the diagram to cut the rafters at the right size and shape.

Building the vents
In order to keep a proper temperature inside the greenhouse, we recommend you to fit wooden vents between the rafters. As you can see in the image, you can get the job done in a professional manner by yourself, by building 2×2 lumber. Fit the frame into place and lock them to the structure with metal hinges.

Attaching the door
Build the door for the greenhouse out of 2×3 or 2×4 lumber. As you can notice in the image, we recommend you to build a simple frame by cutting the components at the right size and lock them together with galvanized screws. Check if the corners are right-angled before fitting the door inside the door opening and locking it to the frame with hinges.

How to build a lean to greenhouse
Last but not least, we recommend you to take care of the finishing touches. In order to get a professional result, fill the holes and the gaps with wood filler and let it dry out for a few hours. Check if there are protruding screws and fix the issue if necessary. Cover the structure with translucent polyethylene foil / polycarbonate sheets and lock it into place with strips of wood, over the greenhouse framing.


Thank you for reading our project about how to build a lean-to greenhouse and we recommend you to check out the rest of the projects. Don’t forget to LIKE and SHARE our projects with your friends, by using the social media widgets. SUBSCRIBE to be the first that gets our latest projects.
5 comments
I love this Desiign , I want to build one for my Orchids .
Thanks for the plan! What would you recommend in terms of a foundation or anchoring for this structure? I’m worried that frost heave might shift it. Also, how would you attach it to the house/garage wall that it’s leaning up against?
The Lean-To Greenhouse looks like a wonderful plan and very interested in building it on the side of my garage.
I have a few questions below and; hopefully, would you be able to spend a couple of minutes answering them?
I didn’t see a shop list, is there one available (for lumber, screws, nails, metal plates, etc.).
Is this a a detached Lean-to 8 ft wide by 10 ft deep & door is on right, correct? I’ve never built anything like this and want to do it right the 1st time. If I wanted to do a 10×10, what would be needed? Is there a plan for this.
The plan mentions top of studs should be cut at 20 degrees before attaching “top plate”. When you mention drilling pilot holes in the plates, what are you referring to? Are these metal plates or just a top piece of 2×4?
Should the rafters be cut straight or angled similiar to studs?
Are rafter hangers or anything else on corners needed?
The narrative mentioned adding a loft, are there plans for this as well?
You need to hire a carpenter Donna, that’s your answer…
Re leanto solar greenhouse:
I’m planning to attach a greenhouse to an unheated shed. Is the exterior colour of the shed important to retaining heat in the greenhouse overnight?? Ie dark colours absorb and retain heat better than light colours, so does the wall of the shed need to be a dark color? Electric or gas heating is not feasible.