This step by step diy project is about how to build a storage bed frame. If you need to use the space of your room efficiently, you should consider building a wooden bed frame with drawers. If you have basic power tools (circular saw, drill machinery, electrical screwdriver) and know the basic woodworking skills, you could get the job done by yourself in just a weekend. Take a look over the rest of the bed frame plans.
You need to build a durable bed frame, so you need to use quality materials and professional tools. We recommend you to use 3/4” plywood or MDF to build the frame of the bed frame, as well as the bottom of the drawers. Nevertheless, you also need to buy 1×2 and 1×3 lumber for the wooden strips you have to attach to the frame of the storage bed. If you want to get accurate cuts, we recommend you to draw the cut lines with a L-square and use a circular saw with a fine blade.
There are may techniques you could use the assemble the components together. The most professional result could be obtained, if you drill pocket holes and insert 3/4” wood screws. Nevertheless, you could also get rigid joints, by drilling pilot holes and inserting 2” wood screws. Make sure the components are aligned, before inserting the screws. You could use these techniques to build a storage bed frame in any size. See all my Premium Plans in the Shop.
Made from this plan
Building a king bed frame with drawers

Building a storage bed
Materials
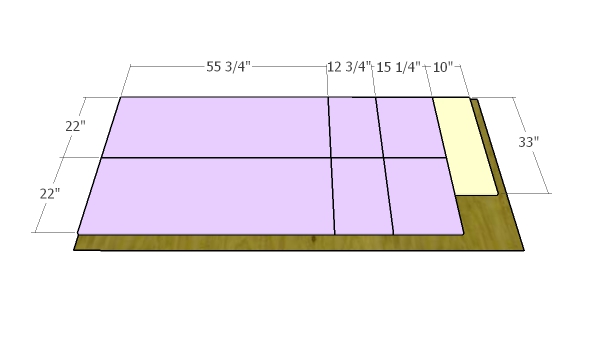
- B – 2 pieces of 3/4” plywood – 15 1/4 x 22”, 1 piece – 12 3/4 x 22” 2xSIDE BENCH
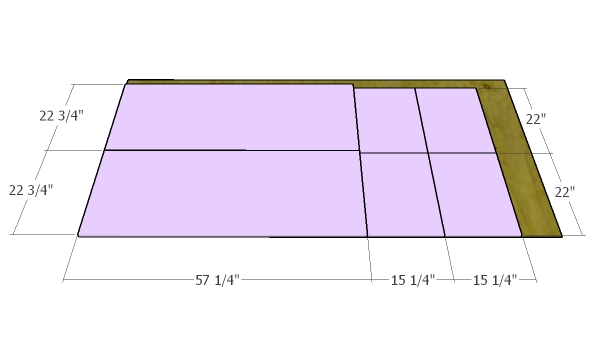
- B – 1 piece of 3/4” plywood – 22 x 55 3/4”, 1 piece – 15 1/4 x 57 1/4”, 1 piece – 22 3/4 x 57 1/4” 2xSIDE BENCH
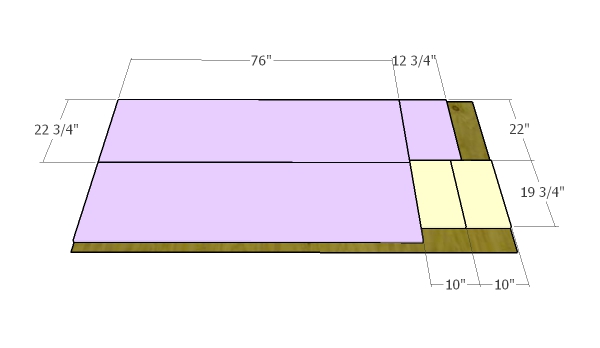
- A – 1 piece of 3/4” plywood – 22 x 74 1/2”, 1 piece – 15 1/4 x 76”, 1 piece – 22 3/4 x 76” FRONT BENCH
- A – 2 pieces of 3/4” plywood – 15 1/4 x 22”, 1 piece – 12 3/4 x 22” FRONT BENCHES
- C – 2 pieces of 2×4 lumber – 57”, 7 pieces of 2×4 lumber – 27 1/2” long FRAME
- D – 1 piece of 1×2 – 77 1/2”, 1 piece – 12″, 1 piece of 1×3 lumber – 77 1/2″, 2 pieces – 12″ TRIMS
- D – 2 pieces of 1×3 – 80”, 10 pieces – 12”, 2 pieces of 1×3 lumber – 80” TRIMS
- E – 1 pieces of 3/4” plywood – 19 3/4 x 31 1/2”, 2 pieces 10″x19 3/4” 2xLARGE DRAWER
- E – 1 pieces of 11 3/4″x35”, 2 pieces of 10″x33” 2xLARGE DRAWER
- F – 1 pieces of 3/4” plywood – 19 3/4 x 22 1/2”, 2 pieces 10″x19 3/4” 4xSMALL DRAWER
- F – 1 pieces of 3/4″ plywood 11 3/4″x26”, 2 pieces 10″x24” 4xSMALL DRAWER
- 7 pieces of 3/4″ plywood – 4’x8′
- 3 pieces of 2×4 lumber – 8′
- 4 pieces of 1×2 lumber – 8′
- 3 pieces of 1×3 lumber – 8′
- 6 pieces of drawer pulls
- 6 drawer slides
- 500 pieces of 1 1/4″ screws
- 100 pieces of 2 1/2″ screws
- 500 pieces of 1 1/4″ brad nails
- glue, stain
- mattress
Tools
- Safety gloves, glasses
- Miter saw, jigsaw
- Chalk line, tape measure, spirit level, carpentry pencil
- Drill machinery and drill bits
Tips
- Pre-drill holes in the wooden components, before driving in the screws
- Apply several coats of wood stain to the wooden components
Time
- One Weekend
Related
- How to build a twin size bed frame
- How to build a queen size bed frame
- How to build a king size bed frame
- Farmhouse queen bed plans
- Airplane swing plans
Check out this VIDEO TUTORIAL! It’s that simple to build a storage bed!
Storage Bed Frame with Drawers Plans
Bed frame plywood components
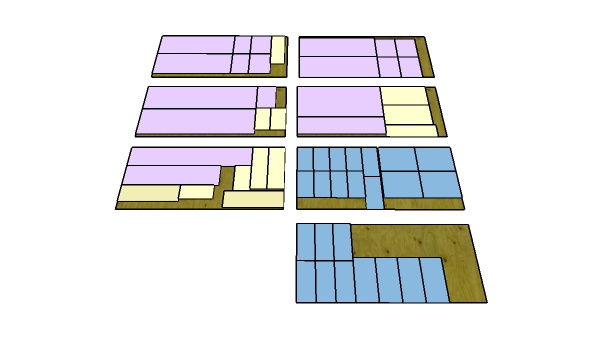
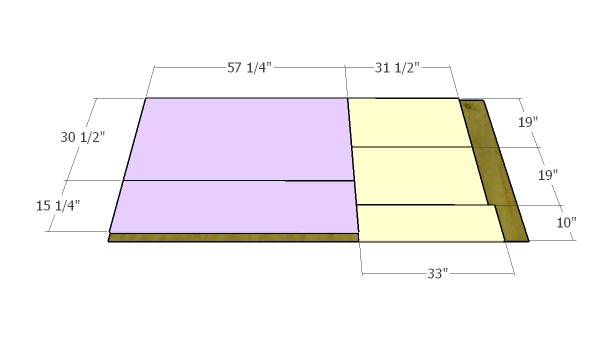
The first step of the project is to cut the components for the frame of the bed and for the drawers. As you can easily notice in the diagram, you need 7 pieces of 3/4″ plywood for the project. The purple components are for the frame of the bed frame, the yellow components are for the front drawers and the blue components are for the side drawers.
First Plywood Piece
Mark the cut lines on the plywood sheet and get the job done with a circular saw. Smooth the edges with sandpaper for a professional result.
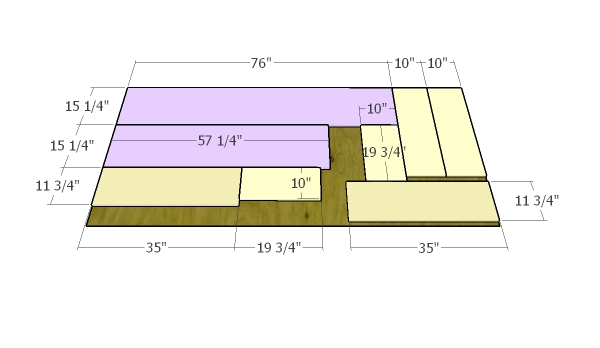
Second sheet of plywood
Continue the project by cutting more components.
Third piece of plywood
Mark the cut lines accurately and you’ve done half of the project.
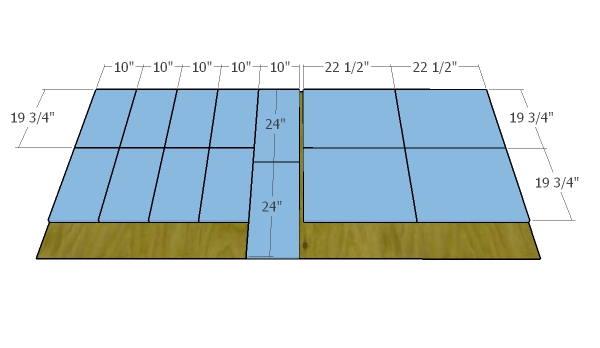
Forth sheet of plywood
More plywood, more cuts, more components.
Fifth sheet of plywood
Mark the components after cutting them, so it would be easier for your at the assembly.
Sixth sheet of plywood
Cut the components for the side drawers.
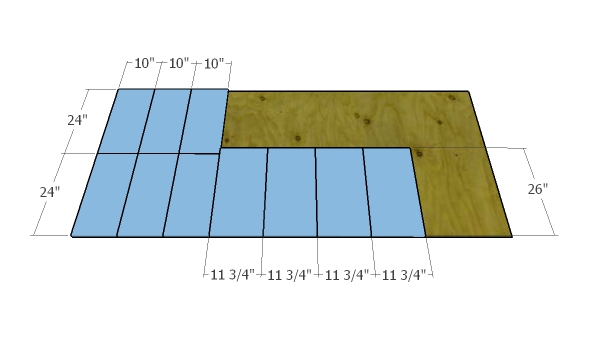
Seventh sheet of plywood
As you can see, there are very few cut outs left from this project. You can use them for other awesome builds. See more plans HERE.
How to build a storage bed frame
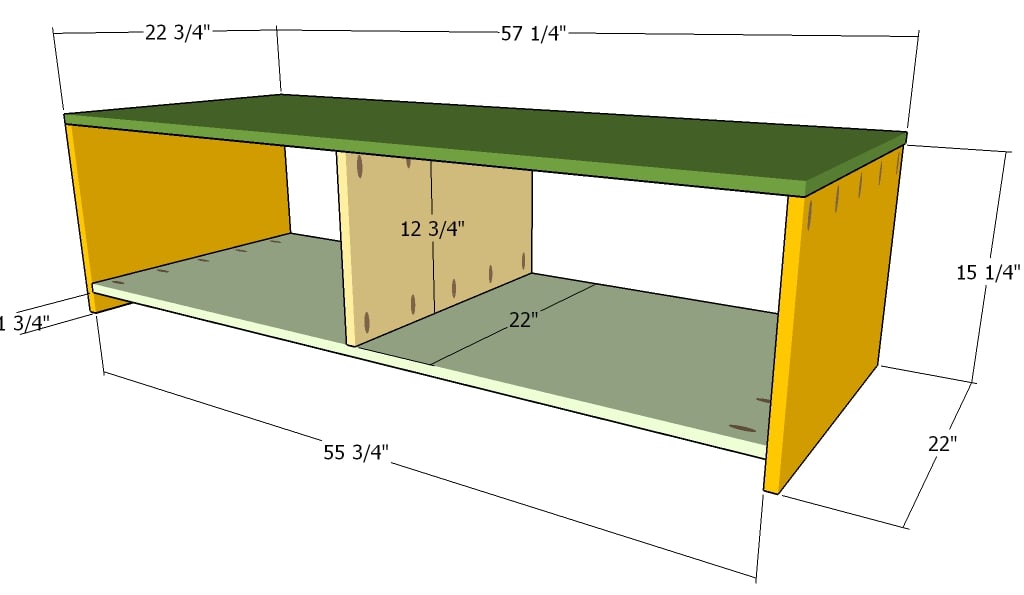
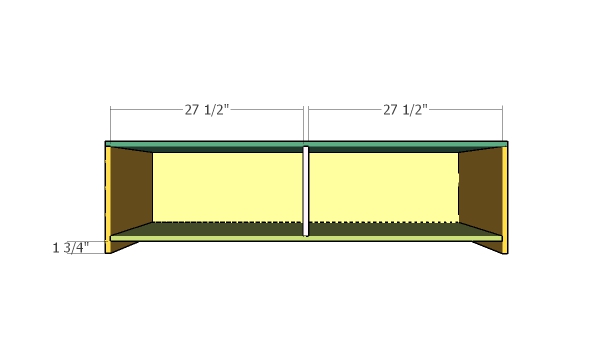
Building the front storage unit
The first step of the project is to build the frames for the side drawers. In order to get the job done in a professional manner and to save time, we recommend you to use 3/4” plywood or MDF. Cut the sheets with a circular saw having a fine-teeth blade, or cut the, directly at the diy store. Drill pocket holes at both ends of the bottom component and of the middle partition. In addition, drill pocket holes along the top edges of the side components.
Front unit back
Attach the back to the front unit. Align the edges with attention and use 2″ brad nails and glue to lock everything together tightly.
Front unit
More building details for the front unit.
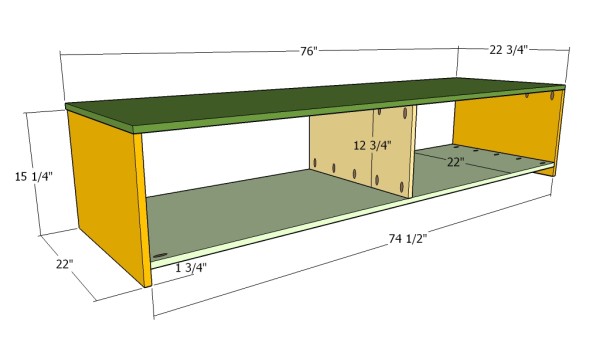
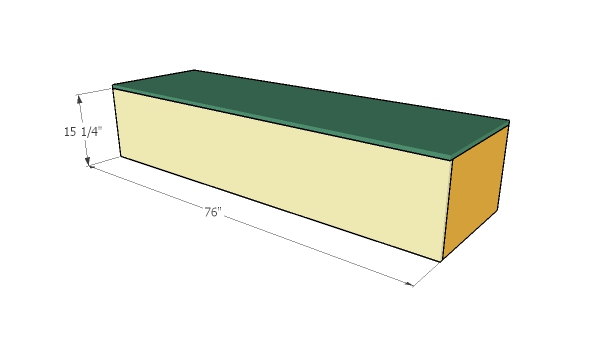
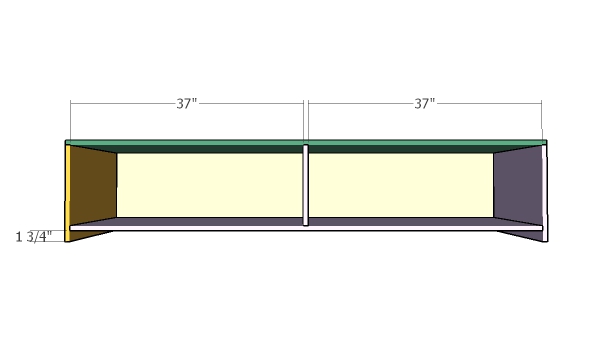
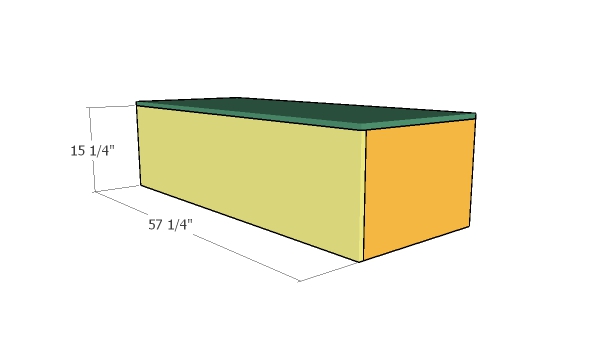
Building the side storage units
Continue the woodworking project by building the front bench of the bed. Therefore, cut the plywood sheets at the right size and assemble them together with 1 1/4” pocket hole screws. Use a spirit level to make sure the bottom and top components are level, otherwise the bed frame won’t have a neat appearance.

Building the front bench
Build the back of the unit out of 3/4″ plywood and drill pilot holes before securing it to the frame of the storage unit. Insert 1 1/4″ screws to get the job done in a professional manner.
Side Units
More building details for the side storage units.
Back for the side units
Attach the 3/4″ plywood back to the side units. Align the edges with attention and insert 1 1/4″ screws to lock everything together tightly.

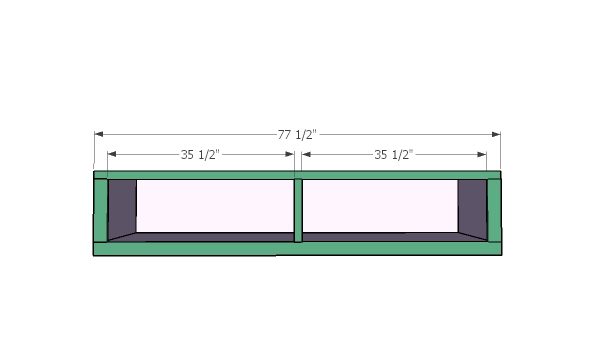
Assembling the bed frame
After assembling the three benches, you should fit them together as in the image. In this project we show you how to build a king bed frame with drawers, but you could use these techniques to build any bed, if you adjust the dimension of the components.
Use a carpentry square to check if the corners are right angled, otherwise the components won’t be aligned one with another properly.
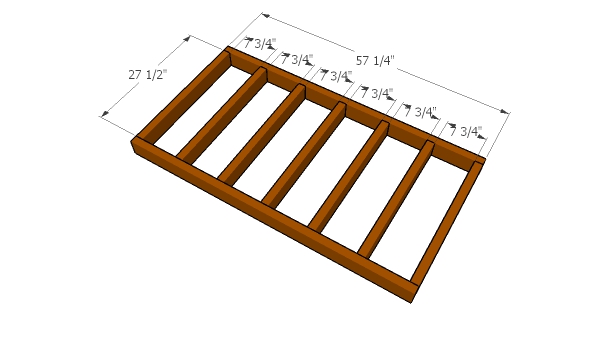
Building the frame
Use 2×4 lumber when assembling the frame for the storage bed. In order to support the mattress efficiently and to distribute the weight properly, you have to build a small frame and attach it between the wooden benches. Use 2×4 lumber to build the frame. Drill pilot holes trough the rim joists and insert 3” wood screws into the short components.

Fitting the frame

Attaching plywood
Check if the frame is level before attaching a piece of 3/4” plywood into place. Secure the plywood into place with 1 1/4” wood screws, makings sure the head of the screws are aligned with the surface.

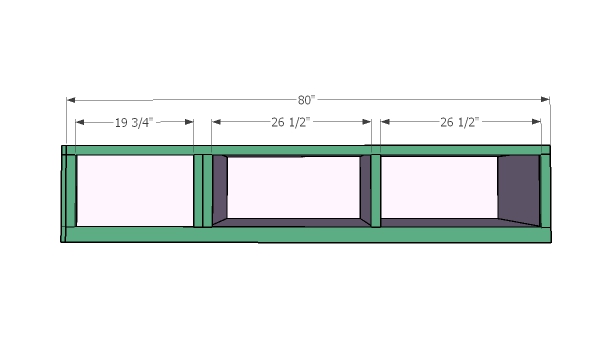
Installing the front trims
Next, you need to attach wooden trims to the edges of the components. As you can see in the image, you need to cut the wooden strips at the right size and secure them into place with glue and finishing nails.
Make sure the trims are flush the edges of the benches, otherwise the bed frame won’t have a nice appearance. Sand the cut edges with 120-grit sandpaper and a sanding block. Use 1×3 lumber for the bottom and side trims and 1×2 lumber for the middle and top trims. Use 2″ brad nails to secure the trims into place.
Front trims
Make sure you space the trims properly, for a neat result.

Fitting the side trims
Continue the woodworking project by attaching the trims to the sides of the bed frame. Use the same techniques and methods to get the job done. Build the bottom trim out of 1×3 lumber, while the rest of the trims should me made of 1×2 lumber. Use glue and brad nails to secure the trims into place properly.
Side trims
Make sure you check out this diagram, before attaching the trims into place with 2″ brad nails.
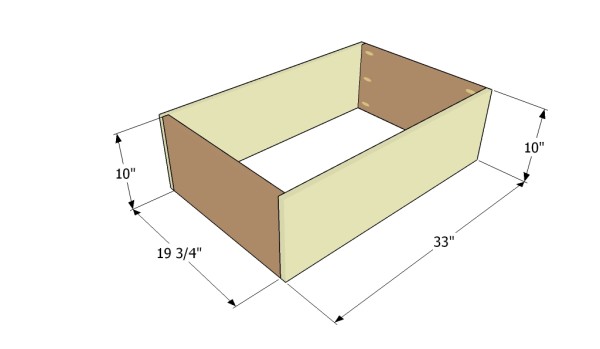
Building the front drawer
Building the drawers for the bed frame is a straight forward task, if you use the right materials and tools. Build the bottom of the drawer of 3/4” plywood and the frame from 1×10 lumber. Drill pocket holes at both ends of the side components. Lock everything together with 1 1/4″ screws.
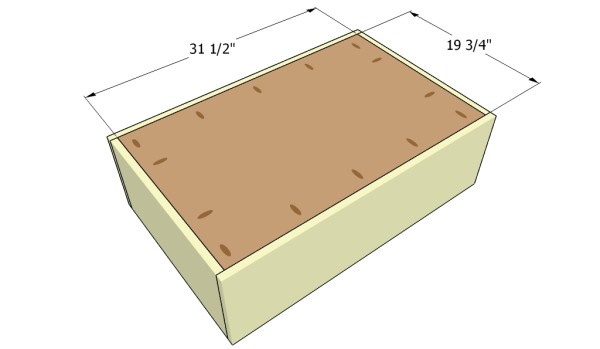
Attaching the bottom to the drawers
Drill pocket holes along the four edges of the bottom component. Align the edges with great care and insert 1 1/4″ screws to secure the bottom into place tightly.

Building the front drawers
After assembling the front drawers, you should give them a nice look by attaching a piece of 1×12 lumber to their front face. Use glue and 1 1/4” screws, driven from the inside of the drawers. Add handles to the drawers.

Building the side drawers
Building the side drawers is not a difficult process, as you need to use the same techniques and materials described above. Cut the plywood and the wooden boards at the right size and assemble them together with 2” wood screws. Use the techniques described above for drilling pocket holes to the components.
Thank you for reading our project about how to build a storage bed frame and we recommend you to check out the rest of the projects. Don’t forget to SHARE our projects with your friends, by using the social media widgets. LIKE us on Facebook to be the first that gets our latest updates and if you want to help us create more free plans for you.
28 comments
ee just built this and it’s way too small to hold our king mattress,,,so I’ve wasted time and money when your instructions specifically say king size!!!
This bed frame has the following total dimensions 77 1/2″ x 80 3/4″. A standard king size mattress is 76″ x 80″. If your king size mattress has other dimensions, that’s another story and I have no responsibility for that. You should always adjust the projects to suit your needs before making the cuts and assembling the components! If you really built this and it’s not a random message you can send a few images and tell me how large is the mattress.
we figured it out although we wish the directions were more detail and complete,thanks!
I am glad to hear that you managed to get the job done. You could send a few images to help and inspire other readers.
The directions do clearly say to measure your mattress first before beginning the project and making appropriate adjustments to the wood cutting.
I love this plan and would like to know if you have the calculations to reduce it for a queen mattress? Do you have cut plan for cutting the sheets of plywood.
I have no plans for making it a queen storage bed frame. If your mattress is 60″ wide, you should make the bed 16″ narrow compared to the plans. As referred to the cutting diagram, there aren’t many ways one can make the cuts, as most of the parts are longer than 48″. Therefore, the large components should be cut lengthwise.
would love to have a list of the raw materials required such as #of sheets of plywood ect
Do you have the dimensions in metric to meet the modern age?
No, I still live in middle age.
What size drawer slides will I need for drawers
16″ drawer slider will do for this project.
Around about cost of this project and list of raw materials please
Do you have plans for a full size storage bed?
Here are all the storage bed plans I have: http://www.howtospecialist.com/?s=storage+bed&x=0&y=0
Do you think this frame would support a softside waterbed mattress?
I don’t know how heavy that mattress is. All I can say is the bed frame will be really sturdy. If other readers have more experience with softside water mattresses, feel free to share your experience.
The 3rd sheet is depicted with 2 ea. 76 X 22-3/4 pieces, however, this is in error. 1 of those sheets should be 74-1/2 X 22. Luckily the 76 X 22-3/4 piece can be cut to suit, so no worries. Another consideration is that the plywood cuts are laid out without factoring in any kerf. The impact of this can be minimized with a thin kerf blade and adjusting accordingly, or making your own cut layout. Otherwise, pretty solid drawing.
The top piece for the front storage unit is 76″x22 3/4″ and the bottom piece is 74 1/2″x22″ Thanks for pointing this out and also for the great tips.
The 3rd sheet is depicted with 2 ea. 76 X 22-3/4 pieces, however, this is in error. 1 of those sheets should be 74-1/2 X 22. Luckily the 76 X 22-3/4 piece can be cut to suit, so no worries. Now a more serious issues arises when assembling the 2 big drawers. The cut layout says to make 2 ea. 19 X 33 pieces. Then the assembly drawing shows that the pieces need to be 19-3/4 X 33. You’ll need the 19-3/4 vice 19 pieces. Another consideration is that the plywood cuts are laid out without factoring in any kerf. The impact of this can be minimized with a thin kerf blade and adjusting accordingly, or making your own cut layout. Otherwise, pretty solid drawing.
Thanks for the feedback. I will take a look and make new diagrams, if necessary.
You mention adding “cleats” to the drawers for the slides. Can you elaborate as to what these are and how to attach. I am a rookie and need more details so it is done correctly. Where exactly do these mount? How do you mount them? Diminsions? Etc.?
Thx
First of all I don’t recommend this project is you are a beginner to woodworking. Secondly, the cleats should be install according to the types of drawer slides you will use. There will be a gap between the drawers and the sides of the boxes, larger than the actual width of the slides.
Some of your pictures do not match up with the descriptions that are under there pictures. Also, some of the measures are not measuring up with the drawings that you provided. The base of the front drawers are off, the dimensions for the side benches are off based on your initial drawing…
This is a good start, but there are some things that I had to do myself in order to make this plan work for me. Just finished planning my alterations, gonna go buy the material tonight and build it this weekend. If it turns out well, i’ll share a photo.
This is an old plan and I don’t have time right now to revise it. However, as you said, considering the limitations, I think it’s a good start for a storage bed project.
Do you have plans for queen size bed with 30 inch deep drawers that are taller also
No, I currently don’t have plans for that.
Looking for ideas/inspiration, maybe even alternatives to the plan I’ve got going in my brain – found this.
I’d just like to thank you for taking the time/effort to put it all out there. A cursory read proves the time you’ve taken & the care with which you’ve shared – it’s impressive & will be appreciated by those who … get it.
Further, I’m impressed you take the time to respond to folks who clearly shouldn’t be using power tools. Perhaps not even hand tools.
I hope the next person desiring to ask you to revise your plan to their individual specs reads this first & GRASPS: one should master a tape measure & a calculator, minimally, before attempting this or any woodworking project.
Then watch some videos.
Then watch some more.
DO NOT pick up a saw or drill if you don’t know to how to measure, or how to rework measurements, or how to convert measurements, to generally ALWAYS CHECK & double check & adjust your measurements as necessary. For the love.