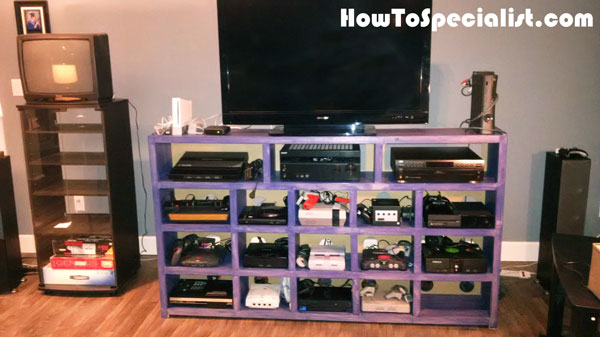
Hello everyone, I am Bren! I wanted to find plans for a nice looking video game console shelf for my son’s 17 video game consoles (and counting). I recently started using some building plans from myoutdoorplans.com which has a lot of great ideas for both indoor and outdoor carpentry projects. They didn’t have any specific plans but led me to this site: imgur.com/gallery/8p2me. The cabinet was very nice looking but actual construction details weren’t great. I decided to use this as a loose plan to go by and here are the steps I followed to complete my project. It took about a week or 25 hours in total at a cost of $200.
I had to decide on the dimensions and material to use for the unit. With respect to building material I would have to use pine mainly due to its affordability. Some projects did use plywood but I didn’t want to have to make a large number of cuts which would make it more difficult to ensure proper joins, sizing etc. Of course if you don’t use plywood you are limited in the depth of the shelves using regular pine boards, the wider boards tend to be cupped or warped one way or another. I did find a good compromise. The building material stores sell pine panels which are smaller pieces of pine joined together which are straighter than the wider pine boards. You need to pick through them because they can split at the ends but if the store has a large supply you can easily find enough for your project. It is also less expensive than the individual pine boards which run about $13 for 1 X 12 X 6 knotty pine, the panels are about $10 each. For the dimensions I did a few spreadsheet scenarios and finally settled on something that suited my needs.
There were a number of things to consider when designing the unit, including the width of the wood being used, trying to use factory length boards to reduce the number of cuts and ensuring all systems could be accommodated. I ended up getting 10 – 1X12X6 pine panels at a cost of approximately $110 including tax. The final layout was slightly different than my plan but not far off. I designed the unit around 6’ shelves so I could use the factory lengths of the pieces. Of course you need to check the lengths just to be sure and sand the edges, but all these panels seem to be very consistent in their length. I checked and sanded five of these for the horizontal shelves. See all my Premium Plans in the Shop.
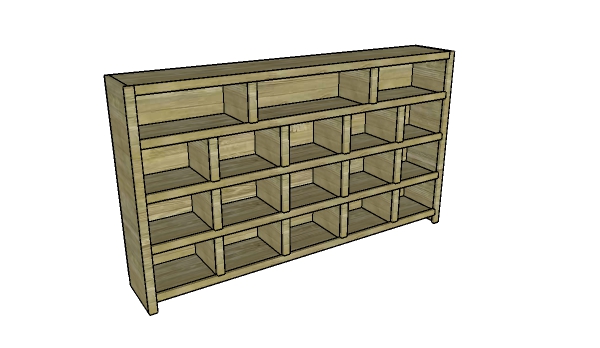
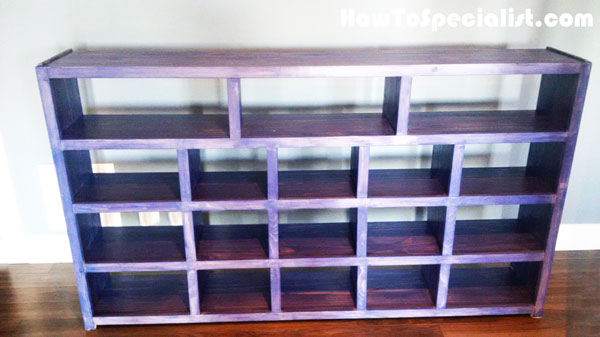
Video game console cabinet plans
See full plans for this project HERE. The free plans come with a complete cut list and with lots of diagrams, so you can build this shelf by yourself.
How to Build a Game Console Cabinet
The console shelving unit from the plan on the website I used as a guide utilized routered cuts in the sides to attach the shelves. I decided to use pocket hole screws since I have a pocket hole kit and they have been extremely strong in perpendicular joining from the few projects I have completed so far. I drilled four holes in each side of the underside of each shelf. It not so important exactly where the pocket holes are placed as long as they are fairly evenly spaced.
Next step was to cut the sides to the required lengths, which would be 42“. I left a small lip at the top of the shelf about 1” high and rounded the outside corners using the ½” round router bit. In retrospect it might have looked neater to have the side flush with the top shelf and the corner rounded but at the time I thought the lip would be better if items were on the top shelf.
Once the shelves and sides were cut the only cuts remaining were the shelf dividers. I figured 9” would be a good size and fit all consoles. Prior to designing the shelves, I had measured all consoles and figured even with room for cartridges and the Wii 9” would fit everything. I set up a stop at exactly 9” on the mitre saw so measuring would not be required for each shelf piece, I could just cut and slide the board along. With 14 dividers to cut out it was essential to have even consistent cuts, the stop I had set up really helped with this and saved time as well.
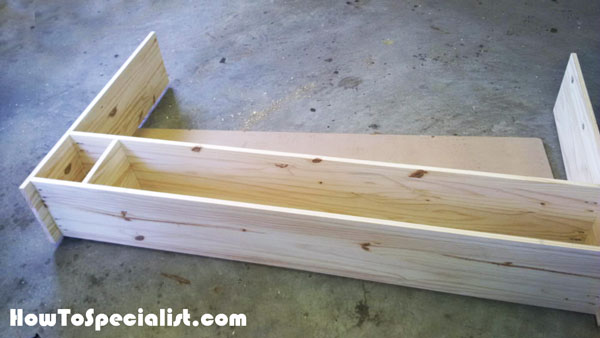
The next step I took was to attach the bottom shelf to the sides using pocket screws. I made a small mistake when I did this. I should have allowed the proper spacing for the bottom trim which was 1X2, meaning the trim would actually be 1 ½” high. Instead of allowing 1 1/2” from the top of the bottom shelf I left 1 ½” at the bottom of the bottom shelf. As a result, the bottom trim would not go flush to the bottom of the unit, it’s no big deal but I should have realized before I attached the bottom shelf. I had some helping hands to attach the bottom shelf and used wood glue to ensure a strong initial bond. It is important to use a flat surface when attaching the first shelf to ensure the joint is perpendicular and even on both sides. I traced out exactly where the shelf would be located before screwing it together.
Once the bottom shelf was in place the other shelves were relatively easy to place. I used two shelf dividers on each end as spacers on the first shelf to locate the placement of each successive horizontal shelf. I could screw in the pocket screws for the shelf with the divider spacers in place which made attaching each shelf quite easy. Its important to keep downward pressure on the shelf as you screw it in so it stays in place. Repeat this process four times and all the shelves will be in place.
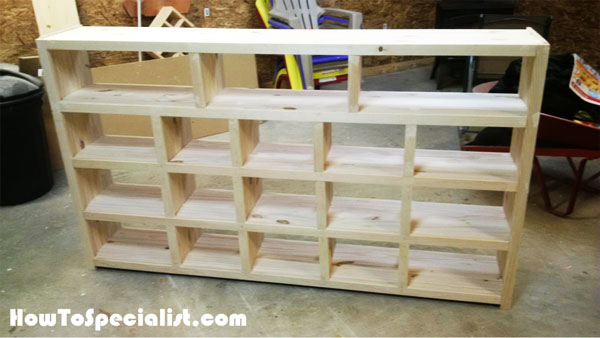
Once the shelves are in place you need to attach the shelf dividers where required. The plan online used a finishing nail gun but I decided to use 1 ¼” wood screws. For the bottom shelves I glued and screwed both sides of the dividers for stability. For the other shelves I used wood glue but screwed the shelf from the top down only. If you staggered the shelves you could screw from both sides but my bottom rows of shelves were symmetrical so that was not possible. I figured two wood screws would hold the dividers in place since they were only providing separation and once the unit was full of systems the dividers would be flush to the shelves from the weight above. Also the divider above would cover the screw holes from the shelf below so less screw head cover up would be required. I took care to counter sink all screws and filled any screw heads with wood putty and sanded as needed.
I used 1X2 pine trim for the front edges, first cutting the sides and attaching with wood glue and 1 ½” finish nails. It is important to sand all edges to remove the sharpness and splintering edges. Second I cut the five shelf trim pieces to fit and glued and nailed them into place. Lastly the divider trim was cut and attached. Once all trim pieces were fit into place I used a nail set to sink all nails heads into the wood. The I used wood putty to fill all nail heads and sanded once dry.
Now that the unit was built the backing needed to be added. I went with 1/8” Masonite as the backboard as opposed to plywood since it was both less expensive and easier to cut openings for the connections for the video game consoles. I cut the Masonite to 6’ across and made note of which side the connections were required from every console and traced 3” holes using a small paint can. I used a jig saw to cut the holes, the Masonite was easy to cut, I drilled a 1/2” pilot hole inside each hole and cut from there. For the audio components that were more than 12” deep I cut out the rectangular space required to extend out the back of the unit. Once I had the holes cut I tacked the backing into place to ensure it all fit properly.
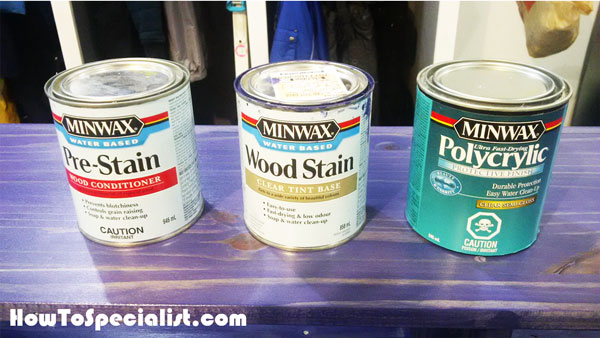
Next was to decide on the finish for my project. My son loves sonic the hedgehog blue so I went with Minwax water based deep ocean stain. After doing some research it seemed like I should first use Minwax water based pre-stain conditioner so I got some of that as well. For interior projects I think the water based products are the way to go, they make for easy clean up and have very low odour.
Prior to applying the wood conditioner, you need to do a good sanding job. If you ever wonder what would happen without a good sanding prior to application, it causes a rough application process and can cause uneven results. I used my random orbit sander with 140 grit and then I used 220 grit on my B&D detail sander over the entire surface.
The pre-stain conditioner can be tricky stuff, you need to apply it, let it sink in and then stain within 3 hours. For a small project this would be no problem but for large projects like my console shelves you need to plan ahead. If you condition the entire unit you may not get the staining complete prior to 3 hours. It is possible but finishing the project is not something you want to rush. I applied the conditioner to top and sides of the project, then moved on to staining. Then I did the top two shelf sections, then the bottom two shelf sections in the same manner. I used a 3” stain brush to apply the conditioner, for the entire project I used about ½ of a 1 L container. I worked it in so the wood looked wet to the touch and left it about ½ hour before applying stain.
The stain was also a bit of a tricky proposition for a beginner like me. The instructions say you need to brush on the stain and then wipe off the excess with a lint free cloth within 3 minutes of application. With a large project this would mean a lot of application and wiping. I used a 3” foam brush to apply the stain, I found it easier to control the application with the foam brush as compared to a regular stain brush, there was less run off over the edges. My plan of attack was:
a. Stain top and then wipe off excess
b. Stain each side and then wipe off excess
c. Stain each shelf cube and then wipe off excess
d. Stain front trim and then wipe off excess
One thing you need to have on hand is a good supply of lint free rags you are willing to throw away. I had some old lint free car wash towels I was willing to part with so I used those. Also you need good disposable rubber gloves because this operation gets very messy. First I used some leftover shelving to practice my technique. A good application of conditioner, followed up in 30 minutes by stain applied with the foam brush, immediately followed up with removing access stain by wiping the lint free clothes with the grain of the wood seemed to work well. You need to make sure you get into the corners where the stain can build up. After about 6 hours I had the entire unit stained and ready for protective coating. There were a few lessons along the way.
a. Do not let the stain sit longer than couple of minutes or it gets noticeably more difficult to remove.
b. Make sure all extra glue is removed before applying the stain, the stain will not cover up the glue, it just makes it look worse. The same goes for screw heads, make sure they are well filled and sanded.
c. Keep an eye on run off, if there are any drips clean them up immediately.
I could have gone with two coats of stain but though my project looked good with one coat. For protective coating I used Minwax water based Polycrylic, it was easy clean up and fast drying. Again I went with the 3” foam brush for application, I probably went through 6 of these brushes in total for the entire project. I applied 3 coats of the Polycrylic in total. It is important to sand with 220 grit sandpaper between coats. I used sanding block (home made of course) to ensure I covered all surfaces. Without sanding, subsequent applications are extremely rough. I know this because I tried one section without the sanding in between.
Once all the finish was complete the backing needed to be attached and consoles set up. I attached the backing with 1” finishing nails along the edges with a couple on each shelf to ensure it was properly secure. Then I put the consoles in place, used Velcro to wrap up all the cords and voila, the project was complete!
Thank you for reading our project about how to build a video game console cabinet and we recommend you to check out the rest of the projects. Thank you Bren for this great project! You instructions are amazing, as well! Don’t forget to LIKE and SHARE our projects with your friends, by using the social media widgets. SUBSCRIBE to be the first that gets our latest projects.