This step by step diy project is about how to build a corner desk. Building a l-shaped corner desk is easy and it will create lots of storage space in your bedroom, but there are a few things that you should take into account. Always adjust the size and the design of the desk to your needs and buy quality materials. Use professional tools and always pay attention to the safety side of the woodworking project. See all my desk plans HERE.
Generally speaking, you should buy the best materials you could afford. Therefore, MDF or pine boards are great choices, as the components will be durable and have a great appearance. Use proper tools (circular saw with a sharp blade) to make the necessary cuts and smooth the cuts edges with a fine-grit sanding block. Always align the components at both ends, before driving in the screws.
In order to get strong joints and to hide the head of the screws, we recommend you to use a pocket hole system. Therefore, drill pocket holes at both ends of the components and drive in 1 1/4” screws. In addition, don’t forget to add wood glue to the edges of the components, in order to enhance the rigidity of the frame. Work with attention and with great care, if you want to get the job done as a professional. Don’t forget to check out the rest of the furniture plans. See all my Premium Plans in the Shop.
Made from this plan
Building an l-shaped desk

Building a corner desk
Materials
- A – 2 pieces of 3/4″ plywood – 24″ x 24″, 1 piece – 38″ x 38″ TOP
- B – 2 piece of 1×2 – 59, 2 pieces – 38, 6 pieces – 18″ , 1 piece – 22″FRAME
- C – 4 pieces of 3/4″ plywood – 29 x 21″, 6 pieces – 21 x 21 3/4″, 2 piece – 29 x 23 1/2″ SHELVES
- D – 4 pieces of 1×4 – 22 3/4″, 4 pieces of 1×4 – 24 3/4″ TRIMS
- E – 4 pieces of 1×8 – 20, 4 pieces – 18 1/4, 2 piece of 1/4″ – 20 x 19 3/4″ DRAWERS
- E – 2 pieces of 1×12 – 21 1/2″ DRAWERS
- 2 1/2″ screws
- 1 1/4″ screws
- glue, stain
- wood filler
Tools
- Safety gloves, glasses
- Miter saw, jigsaw, pocket hole jig
- Chalk line, tape measure, spirit level, carpentry pencil
- Drill machinery and drill bits
Tips
- Apply several coats of wood stain to the wooden components
- Adjust the size of the shelves, according to your needs and tastes
Time
- One Day
Related
- Part 1: Storage unit plans
- Part 2: Corner desk pans
- Rabbit hutch plans
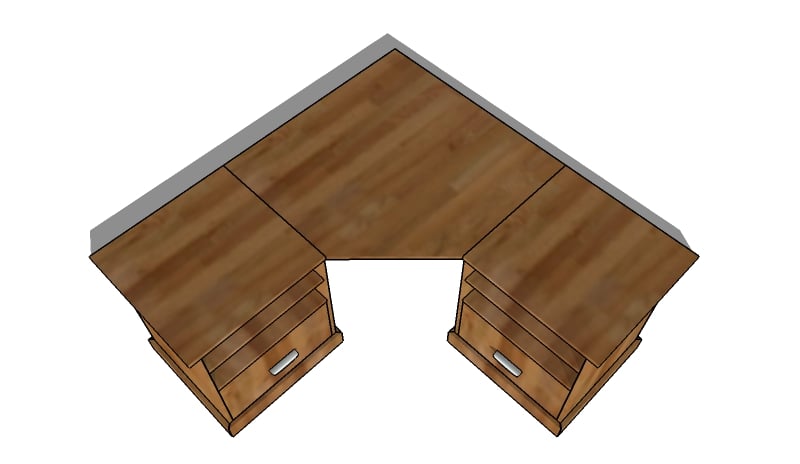
How to build a corner desk

Building the tabletop
The first step of the woodworking project is to build the top of the desk. As you can see in the image, you need to cut three components out of 3/4″ plywood or MDF. In order to get a professional result, we recommend you to take accurate measurements and to make cuts with a circular saw having a sharp blade. Smooth the cut edges with medium-grit sandpaper and place the sheets on a level surface, with the faces downward oriented.

Attaching the frame
The next step of the woodworking project is to attach the frame to the back of the tabletop. Use 1×2 lumber to make the wooden frame and to join the plywood sheets together tightly. Add glue and insert 1 1/4″ screws in order to get a rigid joints. Use a carpentry square to check if the corners are right-angled.

Building the boxes
Building the shelf units for corner desk is easy and can be done by any person with basic carpentry techniques. As you can see in the image, you need to build the frame from 3/4″ plywood. Cut the components at the right size and lock them together with pocket screws. Check if the corners are right-angled after attaching each component and add glue to enhance the rigidity of the frames.

Installing the boxes
Place the storage units on top of the frame and align them at both ends. Afterwards, drill pilot holes, add glue and insert 1 1/4″ into the 1×2 frame. The corners should be right angled and the side walls perfectly plumb. Work with attention and leave the glue to dry out for several hours.

Attaching the bottom trims
The next step of the project is to attach 1×4 trims to the bottom of the shelves and to lock them into place with 1 1/4″ finishing nails. Don’t forget that you should cut the ends of the trims at 45º, as to get a professional appearance.

Building the drawers
If you want to add style and additional storage space to your l-shaped desk, we recommend you to build several drawers, using the instructions and information from the image. Build the drawers from 1×8 lumber, the bottom from 1/4″ plywood and the faces from 3/4″ MDF or from 1×12 lumber.

Fitting the drawers
Fit the drawers inside the boxes and install appropriate slides. Check if the drawers open and close properly before continuing the woodworking project. See the rest of the project to take a deeper look on how to build the storage units for the corner desk.
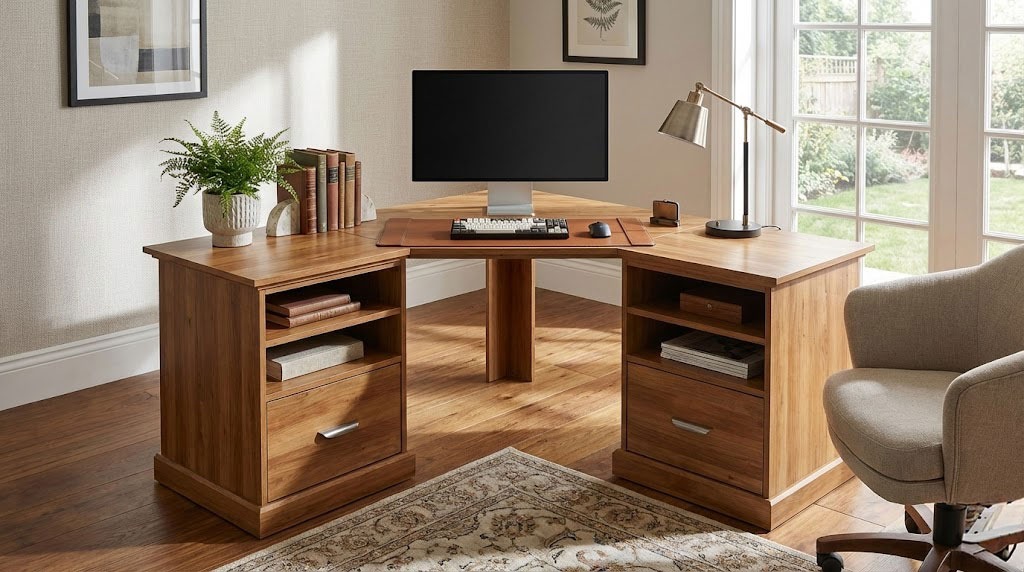
DIY corner desk
This corner desk has a nice appearance and a very modern design.

How to build a corner desk
Last but not least, you should take care of the finishing touches. In order to build a corner desk with a nice appearance, you have to fill the holes with a good wood filler and smooth the surface with 120-grit sandpaper, after the compound has dried out.
Thank you for reading our project about how to build a corner desk and we recommend you to check out the rest of the projects. LIKE us on Facebook and share our projects to help us create more free plans for you.
<< Previous | Next >>
9 comments
May you please explain to me what you mean by “rigid joint” I’ve looked it up but It dosent say what I think your saying. Do you maybe have a picture of a rigI’d joint that would be a better example than what it shows on google? Thank you in advance
Rigid joints as in sturdy joints. You need to use pocket holes and screws for the joints, as it says in the instructions.
You would only attack the frame to top deck with glue? You said pocket screws to attach frame together, but would you not have any screws going into the deck itself?
Glue and brad nails, or screws.
So how much of each piece of material would I need? Like how many 1x8x? Etc.
I don’t have a materials list for this project.
Are the shelves flush with the front or are they inset?
They are flush.
Lots of technical questions on all your stuff here, and lots of great answers. This isn’t a question or anything I just wanted to say great job and thanks on behalf of all of us who use these without commenting.