This step by step diy project is about how to build a simple chicken coop. Building an easy chicken coop is a nice weekend project, if you want fresh eggs every day. This article features detailed instructions about making a simple A-frame chicken coop, that can be built by virtually any person with average woodworking skills. Work with attention and plan everything from the very beginning, if you want to get a professional result.
When building an easy chicken coop by yourself, there are several aspects that you should take into account, especially if you want to get a professional result. First of all, you need to use weather-resistant lumber, as the chicken coop will be exposed to moisture. Pressure-treated lumber, pine or cedar are great choices, as long as the components are straight and in a good visual condition.
On the other hand, you should drill pilot holes trough the components before inserting the screws, to prevent the lumber from splitting. Always align the components at both ends, if you want to get a nice appearance. It is essential to attach handles to the chicken coop, as you need to move it from time to times. In this manner, you can ease the procedure and two persons are enough to get the job done.
Building a chicken coop is a great backyard project, especially if you have a large garden or if you want to have fresh eggs every morning. In this project we show you detailed plans for building an easy chicken coop. In order to build a simple chicken coop, you need to use the following materials and instructions. See all my Premium Plans in the Shop.
Made from this plan
Building an easy chicken coop

Building a chicken coop
Materials
- A – 9 pieces of 2×4 lumber – 60″ long FRAME
- B – 6 pieces of 2×4 lumber – 32 3/4″ long – both ends cut at 60º, 1 piece of 3/4″ plywood – 28 1/2″x57 3/4″ long NEST
- C – 4 pieces of 2×4 lumber – 120″ long, 2 pieces of 2×4 lumber – 147 3/4″ long SUPPORTS
- D – 2 pieces of 3/4” plywood – 24″x60 3/4”, 4 pieces of 1×4 – 24”, 4 pieces of 1×2 – 53 3/4” DOORS
- E – 4 pieces of 2×2 lumber – 25″, 4 pieces – 24″, 2 pieces of 2×4 lumber – 25″ TRIMS
- F – 2 pieces of 2×2 lumber – 44 1/2″ long, 6 pieces of 2×2 lumber – 11″ long LADDER
- G – 100 sq ft of chicken wire WIRE
- 10 pieces of 2×4 lumber – 8 ft
- 4 pieces of 2×4 lumber – 10 ft
- 2 pieces of 2×4 lumber – 14 ft
- 1 piece of 1×4 lumber – 8 ft
- 2 pieces of 1×2 lumber – 10 ft
- 4 pieces of 2×2 lumber – 8 ft
- 2 pieces of 3/4″ plywood – 4’x8′
- hinges
- 100 sq ft of chicken wire
- 2 1/2″ screws
- 1 1/4″ screws
- glue, stain
- wood filler
Tools
- Safety gloves, glasses, Miter saw, jigsaw
- Chalk line, tape measure, spirit level, carpentry pencil
- Drill machinery and drill bits
Tips
- Apply several coats of wood stain to the wooden components
- Fill the holes with wood filler and smooth the surface
- Fit 1×4 trims to add character to your woodworking project
Time
- One Day
Related
How to build a simple coop

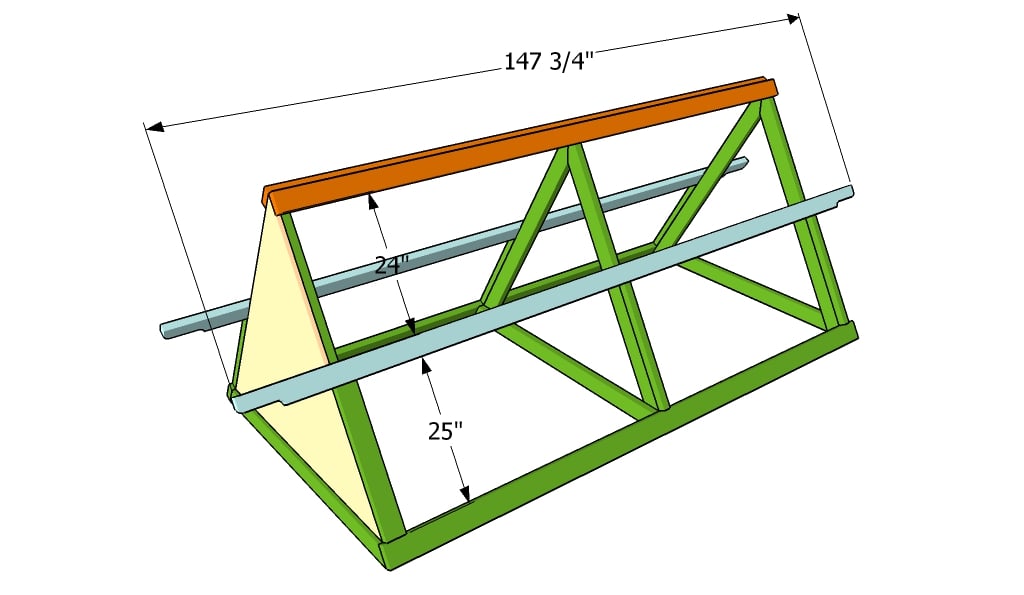
Building the a-frames
The first step of the project is to build the frames of the chicken coop. In order to get a professional result, you need to build three triangles, using 2×4 lumber. Make sure you use a miter saw to cut the boards at angle. In addition, align the boards at both ends before locking them together with 2 1/2″ galvanized screws.
Drill pilot holes before inserting the screws, to prevent the lumber from splitting.

Building the frame of the coop
Continue the woodworking project by securing the triangles together with 2×4 slats, as in the image. Make sure you place the components equally spaced, if you want to get a professional result from the very beginning.
Work with attention and with good judgement, if you want to get a professional result. Use a spirit level to check if the A-frames are plumb, before installing the slats.

Installing the back
The next step of the project is to attach the back wall of the chicken coop. As you can see in the image, you need to cut the piece out of 3/4″ plywood. Use a circular saw with a sharp bade to get the job done with attention.
Attach the piece of plywood to the A-frames and secure them into place with 1 1/4″ screws. Work with attention and with great care, making sure you align the component at both ends.
Fitting the handles
Fit 2×4 handles to both sides of the chicken coop, as described in the diagram. Center the handles to the structure and lock them into place using galvanized screws and glue.

Building the nest
Afterwards, you should frame the nest for your chicken coop. As you can see in the image, you need to attach the handles, before installing the 2×4 rafters. Use a spirit level when installing the rafters, as to make sure the surface is perfectly horizontal.

Fitting the trims
As you can notice in the image, you need to round the ends of the middle braces, as you will be using them when moving the chicken coop in your backyard. Attach chicken wire to the frame and secure it into place with staples.
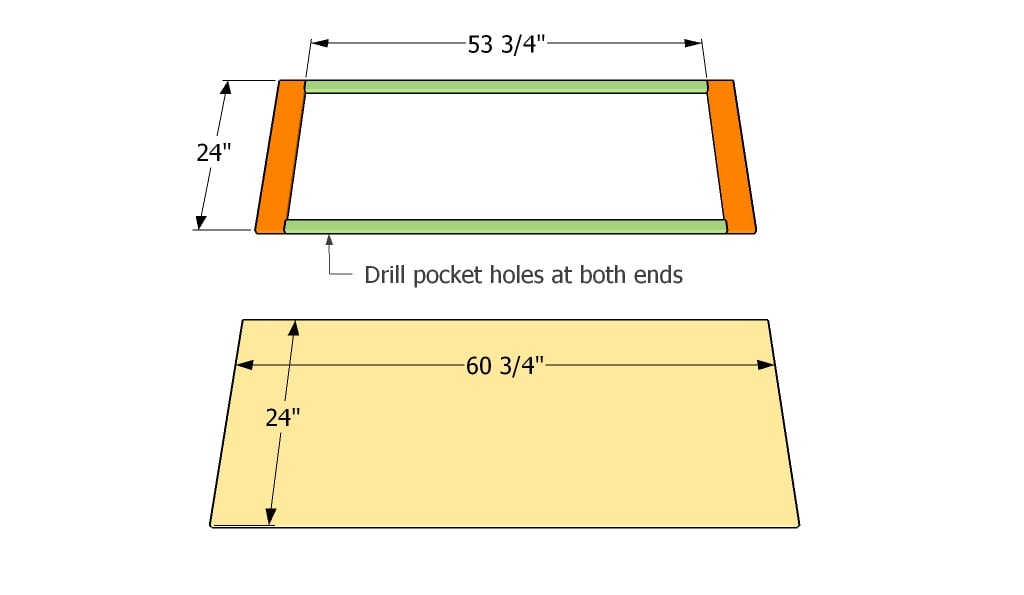
Building the door
Build the door panel out of 3/4″ plywood. Fit 1×2 and 1×4 trims to the door panel in order to add strength to the structure. Use glue and 1 1/4″ finishing nails to lock everything together.

Fitting the door
Building a door is a great idea, especially if you want to have an easy access to the nest. In this manner, you will protect the chickens from bad weather and rain, but you can also collect the eggs easily, every morning.
Attach the wooden trims to the 3/4″ plywood piece, in order to get a professional result. Fit the door into place and secure it to the middle component with metal hinges.

The side of the nest
As you can see in the image, you need to build another door, exactly in the same manner described above, for the opposite side of the chicken coop. You can secure the components to the frame with screws or you can install hinges, if you want to have a better access to the nest.

Building the ladder
Build a simple ladder from 2×2 lumber, using these plans. Drill pilot holes trough the components before inserting the screws, to prevent the wood from splitting.

How to build a simple chicken coop
Last but not least, we recommend you to take care of the finishing touches. Fill the holes with wood filler and let it to dry out for several hours. Afterwards, smooth the wooden surface with fine-grit sandpaper.

Thank you for reading our project about how to build a chicken coop and we recommend you to check out the rest of the projects. Don’t forget to LIKE and SHARE our projects with your friends, by using the social media widgets. SUBSCRIBE to be the first that gets our latest projects.
9 comments
Great instructions! Easy to understand.
Thanks!
You’re welcome. Let me know how it comes out!
I think the angles are incorrect. I cut the bottom at 30 degrees and the top (peak of the a-frame) at 60 degrees.
Halfway through with ours! We used 1×4’s instead of 2×4’s and had to reduce the length a bit because we only found 10 foot pieces where we live. Also we are swapping out the chicken wire for 1/4″ hardware cloth. Will update when finished!
Thank your for this detailed planed. We have now 2 holes. We added a little dor, so that the hole can acces to an enclosure in our garden.
How many chickens does the coop hold?
3 chickens
Is this chicken tractor water tight
Très dommage que les dimensions ne soient qu’en pouces (“) . Il n’est pas aisé de les convertir en ‘m’ et ‘cm’