
This article is about how to make a wood fired pizza oven. Building a wood fired pizza oven is a complex project, but with a little effort you can change dramatically the look of your backyard. Making a wood fired oven doesn’t mean you could only bake pizza, on the contrary you can also cook bread and any other food inside the brick dome. We can assure you will be amazed by the extraordinary taste of the food and that you will spend great moments together with your family, cooking your favorite dishes.
You have to build a durable foundation for the wood fired pizza oven, as to support the weight of the bricks and of the concrete countertop. Work with patience and make sure you use the right recipes for concrete, otherwise the foundation might crack in time. The depth of the footings vary according to the soil structure, therefore you should consult an engineer or study the local building codes.
The location of the pizza oven is essential for its functionality and safety. Therefore, you should make the wood fired pizza oven far away from any inflammable substances and from wooden sheds (the hot smoke might inflate a wooden construction). In addition, make sure you place it at a proper distance from doors, windows and hatches, as to prevent the smoke from getting in your house (at least 20-30′ / 6-9 m).
Materials
- 2×4 wooden boards – FORMWORK
- Gravel, sand, cement, rebars – FOUNDATON
- 50 concrete blocks – BASE
- Concrete, reinforcing bars (no. 8 – 12) – COUNTERTOP
- Flagstone / soapstone – COUNTERTOP
- 15-20 refractory bricks ( 9 x 4 1/2 x 3 ” ) or (23 x 11,5 x 7,5 cm) – COOKING FLOOR
- 200 regular bricks – 3′ DOME
- Fire clay and sharp sand – FIRE MORTAR
- Shards of glass – FLOOR INSULATION
- Screws and nails
Tools
- Safety gloves, glosses and proper cloths
- Brick saw – to cut the bricks
- Power mixer – to prepare concrete
- Measuring tape, pencil, spirit level
- Pliers – to create the reinforcing structure
- Bucket – to prepare brick mortar
Tips
- Make sure you comply with the legal requirements, before starting teh construction
- Buy or rent a power mixer to save you from a hard work
- Pay attention to concrete recipes as they are essential for a proper job
Time
- Two weekends
Related
Building a wood fired pizza oven

Buidling a wood fired pizza oven
If you follow our step by step guidelines, you will make an eye-catching wood fired pizza oven, therefore all your friends will visit you quite often. Consequently, make sure you leave a space of at least 100 sq ft (10 m2) around the construction, as to set a table and some chairs. In addition, you can add a nice patio to enhance the look of your outdoor kitchen.
Smart Tip: On the market there are many types of concrete blocks (for the base). In addition they come in many sizes, making your choice a bit difficult. From our experience, we can assure you that most of them are good for your project, provided you select the ones without cracks or other visible damages.
Pouring the wood fired pizza oven’s foundation

Pizza oven foundation plans
First of all you have to make the foundation of the wood fired pizza oven. Therefore, you have to dig trenches (1-2′ according to the soil structure), install a reinforcing structure and pour concrete. Building the foundation is essential for your project, therefore make sure you pay attention to this aspect. Making a poor foundation means a shorter lifespan for your pizza oven. We recommend you to consult a qualified engineer to help you with a plan, according to the soil structure.

Pizza oven foundation
Next, you have to pour the concrete. In order to mix the concrete, you could use either a power mixer (we strongly recommend you to buy or rent one, as it gets the job done quickly and professionally) or mix it by hand (it will take longer and you need to use your muscles).
In order to make the foundation, you have to use the following concrete recipe: 2 parts cement, 3 parts sand, 4 parts gravel and water, as to obtain a compound with consistency of cream. You should use a wheelbarrow to transport the concrete from the power mixer to the construction site.

Pouring wood fired oven foundation
Ideally, you should pour the foundation at once on the whole surface, otherwise you risk damaging its rigidity. Therefore, make sure you buy enough cement and sand, before starting the project.
Make sure you finish the concrete foundation with a straight edge. The technique is simple: push the straight edge along the formwork (which should be perfectly level), holding it firmly, using zig-zag moves. If the concrete has the right consistency, the foundation will look as in the image.
Making the base of the wood fired pizza oven

Building wood fired oven base
Next, you have to build the base of the wood fired pizza oven, by using concrete blocks. When laying the concrete blocks, you have to use a L-square, to make sure the corners are right angled.
In order to lay the concrete blocks, you have to use mortar prepared using the following ingredients: 3 parts of cement, 5 parts of fine sand and water, as to obtain a compound with the consistency of cream. Use a margin trowel to spread the mortar on the blocks, and a spirit level to make sure the walls are plumb and level.

How to make pizza oven
Continue laying the concrete blocks as we have described above, making sure you check the level of the walls. Work with patience, as to get the job done as a professional. In most cases, 4 rows of concrete blocks will be just enough, which means the walls must be around 2 1/2′ (70 cm).
In order to make the concrete blocks bond one with another, you have to leave 1/2” clearance space between them and fill it with cement mortar. Make sure you use gloves while working with mortar, as it might harm your skin.

Making sure the walls are plumb
Use the spirit level on all directions, to make sure the walls are plumb and level. This aspect is essential for the look of your wood fired pizza oven, so make sure you work properly. Remove the excess mortar with a wire brush, if you want to obtain a neat appearance.

Using rebars to reinforce countertop
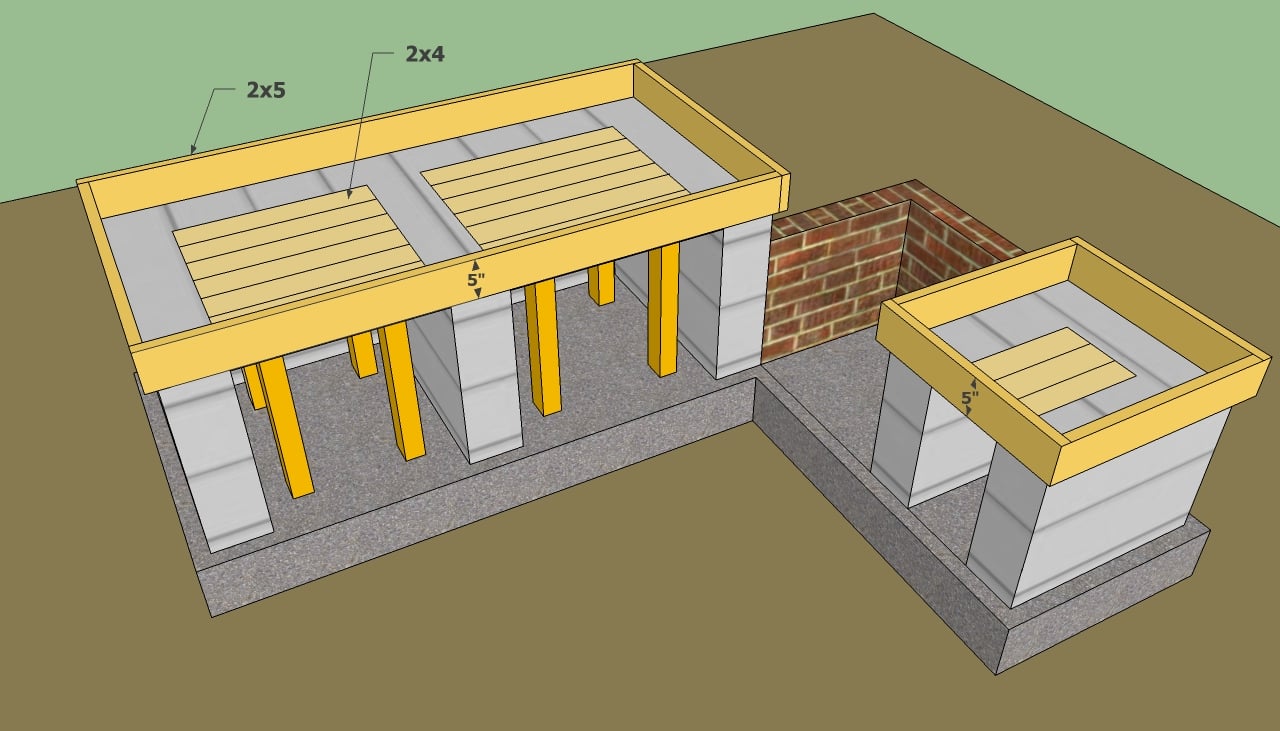
The next day, you have to build another formwork for the countertop, as in the image, by using wooden boards. Next, you have to create a rigid net with reinforcing bars. In order to lock the rebars together, you have to tie them with construction wire.

Reinforcing countertop with bars
In this image you can see the reinforcing net made of steel rebars. As you can easily notice, you have to raise it a couple of inches from the formwork, by using spacers (or small pieces of bricks).
Next, you have to build the formwork on the lateral sides of the countertop, making sure it is perfectly level. As a general rule, the countertop should be 5” (12 cm) thick, to be able to sustain the weight of the brick oven. Pour the concrete in and wait a couple of days until it dries out.
How to make a wood fired pizza oven

Building wood fired oven
Next, we will show you how to make the wood fired brick oven. We like the traditional dome shape, therefore you first have to draw a circle on the concrete countertop. For a small and simple pizza oven, we recommend a diameter of 3′ (90 centimeters), as to be able to bake 3 average pizzas at once. In order to get a perfect circle, follow these steps: establish the center and use a 1 1/2′ string with a pencil at one end to draw the circle, while locking the other end on the center. You should describe a perfect circle to guide you while laying the bricks.

Shards of glass under base flooring
Use small pieces of bricks (cut a brick in half longitudinally, and each half again in half by using a we saw) and place them over the circle with a little cement mortar. Inside the circle you could lay shards of glass mixed with sharp sand, as to store the heat developed inside the wood fired pizza oven.
In this way, when burning the wood inside the brick dome oven, the glass mixed with the sand will retain the heat for a long period of time and it will liberate it slowly.

Building pizza oven flooring
Next, use fire bricks to make the cooking floor of your wood fired oven. As you can see in the image, you have to leave 1/2” (1 cm) clearing space between the fire bricks and fill it with refractory mortar (4 part of sharp sand, 6 parts of fire clay and water).
Use a spirit level to make sure the cooking floor is level, and a rubber hammer to align them. Make sure you pour a layer of sharp sand over the shards of glass, otherwise you won’t be able to lay fire bricks properly.

Pizza oven flooring
Afterwards, you have to finish the countertop by installing flagstone at the same level with the cooking floor. Use the spirit level and a mallet to install the flagstone in a professional manner. Let the concrete to dry out properly for several days, before filling the gaps with a mix of fine sand and cement.

Making brick pizza oven
Start laying the first row of bricks after you have drawn again a circle, in the same manner described above. In order to obtain the dome shape, you have to cut the bricks in half (as to get 2 square pieces) and lay them using refractory mortar (4 parts sand, 6 parts clay and water). If you don’t add the sand, the mortar will crack and your wood fired pizza oven will collapse.
In addition, it is essential not to use cement based mortar, as it will not resist to the high temperatures developed inside the wood fired pizza oven.

Laying bricks on wood fired pizza oven
Add the next rows of bricks making sure you fill the space between them with refractory mortar. Make sure the bricks are aligned one with another, as to get a neat dome. If you have sensitive skin, then you should definitively use gloves when laying the bricks.
This construction technique is very old, so you should be convinced it works perfectly and it is quite durable. From time to time, it is better to make a few steps back and look at the dome from distance. Assess its shape and adjust it if necessary.

How to make wood fired pizza oven
Starting with the third row, you should lay the bricks at angle, as to begin constructing the dome shaped wood fired pizza oven. If needed, you should cut smaller bricks as to fit into location.Work with patience, as to comprehend and master this technique. If needed, you can use small fragments of bricks to tilt the bricks.

Building wood fired pizza oven
In this image you can see the pizza oven from a different angle. Therefore, you can see the perfect circular shape and the way it looks on top of the cooking floor.
You should also notice the rectangular hole placed in front of the cooking floor, as it has an essential role. After the woods have burned out you should pull there the embers, as to create a hot curtain. In this away the cold air won’t get in the dome and the pizzas will bake properly.

Wood fired pizza oven dome
Continue laying the next courses of bricks, making sure you tilt them, in order to get a beautiful dome shape. Cut the bricks to the right size, using a wet saw (wear safety glasses and a respiratory mask).
In the front of the pizza oven you can see that we created a space that in short time will become the entrance of the wood fired dome. The entrance of the pizza oven can vary according to your needs and tastes, but for this small project, we recommend you to make it of about 10”.

Wood fired pizza oven chimney
In order to build the entrance arch you should use a polystyrene board and cut it to the needed dimensions. For extra rigidity, you should use cement mortar between the entrance arch.
In the image, you should also notice that we started to build the chimney beside the wood burning pizza oven. Our project is more complex as it also contains a cooking stove and a metal sheet oven, which is heated by the hot smoke coming from the stove. Nevertheless, you could stick to building only the wood fired pizza oven.

Pizza oven entrance arch
Work with patience and add more bricks, as you can see in our plans. It is important to take time to analyze the situation, as to understand what you are doing. Select and use only the qualitative bricks, as the ones with cracks will reduce the efficiency of your wood fired pizza oven.

Laying the top of the pizza oven dome
In this image you can see the top of the pizza oven dome: in the left side you see the place where the smoke will come out, while in the right side you can see the unfinished top of the dome. Therefore, we have to complete the dome by laying the last bricks on the top.

Brick pizza oven chimney
Continue the project by building the smoke channel from the pizza oven dome to the chimney. In order to make the angle cuts, you have to use a wet saw. A wet saw might be expensive to buy, but it is the best tool you can use for this project. If you cannot afford buying a wet saw, you have to rent or borrow one.
Don’t forget to clean the bricks by using a sponge and clean water, as later it would be much harder to do it. In this way your wood fired pizza oven will have a neat look.

Brick chimney for pizza oven
In order to build the chimney, you have to lay the bricks on stretcher. You can also lay them down in the regular way, but you will use a lot more bricks and consequently, the cost will increase.

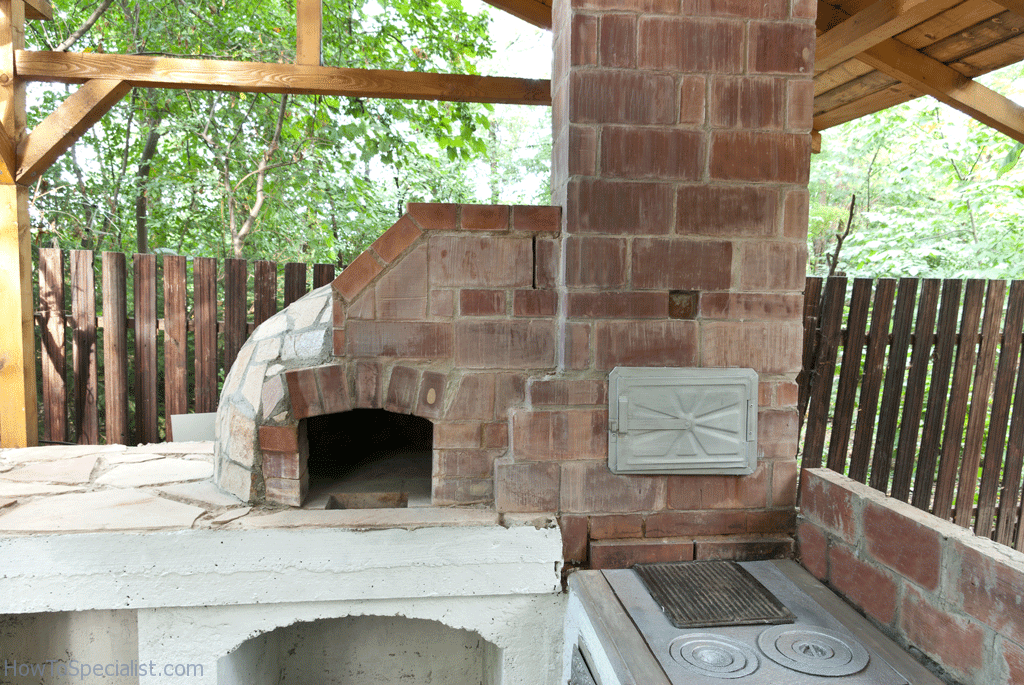
Wood fired pizza oven
The brick wood fired pizza oven is almost completed, the only thing remaining to do is to place several bricks over the smoke channel, and to cover the dome with fire clay mortar.
If you have all the needed materials and tools, and work with great care, you can make a wood fired pizza oven in 1-2 weeks, according to your skills and the complexity of your project. It might be an expensive and tough project, but you always have the alternative of buying a kit.

Wood fired pizza oven
Last but not least, you shouldn’t make a fire in the pizza oven for at least one week. In this way, you allow the clay mortar to dry out. In addition, you should also consider insulating the brick oven and check out the rest of the project.
Thank you for reading our article on how to make a wood fired pizza oven and we recommend you to check out the rest of our projects. Don’t forget to share our projects with your friends, by using the social media widgets, if you’ve found this article useful.
Related projects: