
This article is about how to tile around window. Tiling around a window is a technique that you have to learn thoroughly, before installing kitchen or bathroom tiles. From our experience, we can assert that tiling around windows is maybe the most difficult operation when installing tile in a kitchen or in a bathroom, therefore we have decided to write am article, as to share our expertise with our readers. The most important aspect is that we always prefer using plastic or metal tile corner trims, as to hide the edges and to get a neat look (the corners will be round and it’s easier to make them plumb). Nonetheless, you can still tile around a window using traditional techniques, meaning that you just install the tiles in a corner, without using a plastic trim (it would take longer to get the same neat look).
Tiling around a window is an easy task if you use a plastic tile corner trim. In addition, the tile edging is not expensive, it is easy to use and most importantly it will change dramatically the look of your bathroom or kitchen. In order to cut it to the needed length, you have to use a cutter or a miter saw. In addition, if you have to install the plastic trim around a right angled corner, you have to cut each piece at 45º, by using a cutter or a miter saw.
In order to tile around a window, you have to spread thin-set on the wall, by using a notched trowel. Then measure around the window, as to cut the tiles (with a score and snap cutter or a wet saw) to fit into location. When installing the tiles around windows, make sure you first secure the tile corner trim in thinset. Leave the tiles to dry out for at least two days and then apply the colored grout by using a grout float. Use a sponge and a bucket with water to clean the grout off the tiles, to obtain a professional look. See more tile projects HERE.
Made from this plan
In order to tile around a window, you need the following:
Materials
- Thin set mortar / premixed mastic
- Tiles, tile corner trim
- Tile spacers
Tools
- Safety gloves, glasses
- Drill machinery with mixing palette
- Bucket, rubber hammer
- Cutter / miter saw
- Score and snap cutter, wet saw
Tips
- Use tile plastic corner trim
Time
- 2 Hours
How to tile around window

First of all, you have to prepare the surface, by removing the bumps and other irregularities. Use a large scraper and level the wall surface or apply an even coat of cement plaster.

Next, you have to prepare thinset in a clean bucket. Fill 1/3 of the bucket with water and then pour the thinset powder, leaving it to soak moisture for 5 minutes. Afterwards, mix the adhesive by using a drill with a mixing paddle or a margin trowel. If the thinset doesn’t slip off the trowel, it has the right consistency.
Spread an even layer of thinset on the wall, by holding the trowel at 45º. Comb the adhesive several times, until the coat is perfectly level.

Next, you have to install the tiles around the window. In order to secure them properly, you have to use a mallet and hit the tiles gently, until the tiles are on the right position. Use a spirit level to make sure the wall tiles are plumb.

In order to obtain a nice look and to get the job done quicker, we recommend you to use plastic tile corner trims. These plastic trims are extremely useful and come at good price. In addition, you can choose from many designs and colors, as to fit them with your bathroom or kitchen tiles. The corner trims add style to any room.

Install the corner trim in place, making sure it is perfectly plumb and level, by using a spirit level. Work with patience and with great care as to ensure you cut the tiles at a proper dimension.
Install spacers between the tiles, as to keep them evenly spaced. At 90º corners, you have to cut the two pieces of plastic trim at 45º, by using a cutter or a miter saw.

After you install the tiles and the plastic trim, you should wait for several days until the thinset has dried out. Afterwards, prepare colored grout in a small bucket and apply it around the window, by using a grout float.
Clean the surface with a wet sponge and them wipe the surface with a dry cloth. If you have followed our steps, you should get a nice tiled window.
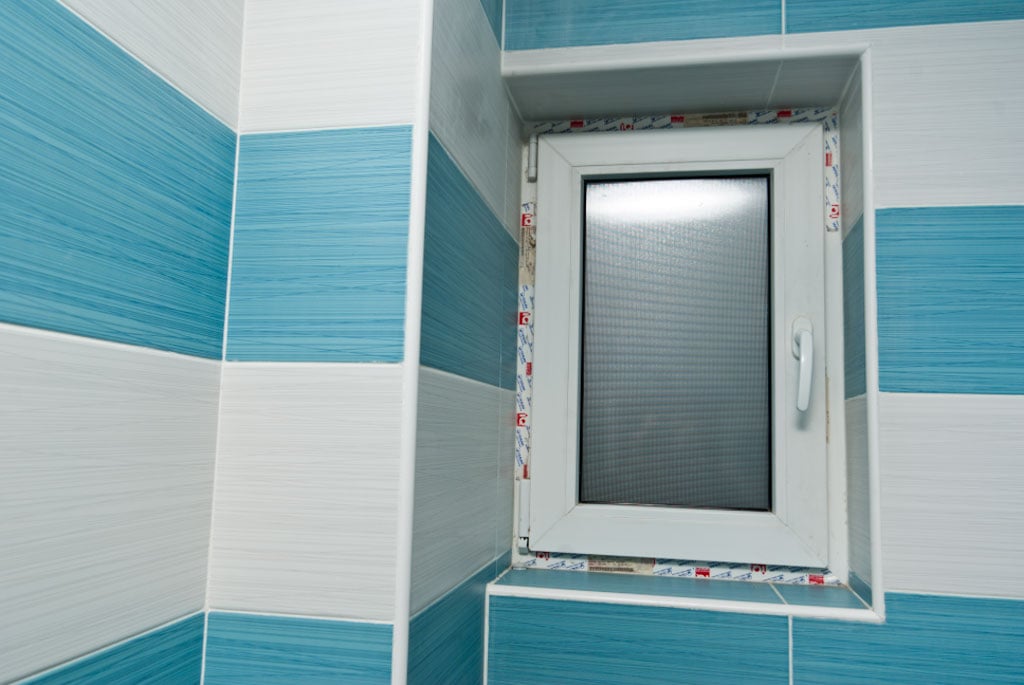
Tiling around windows

In this image, you can see another bathroom window with a different design. Therefore, we will show you how to tile around it, by using the same techniques. The first step is to prepare the surface, by leveling the wall and removing the bumps or other residues.
Install tiles around the window, by spreading an even coat of thinset with a comb trowel. Afterwards, install the bathroom tiles and place spacers between them, as shown in the image.

Secure the tile edging into thinset and use a large level to make sure it is plumb. Next you should fit the tiles on the wall inside the corner trim. Next, spread tile adhesive on the other side of the corner wall, by using a notched trowel. Afterwards, lay the tiles on the wall, one by one, making sure you align them with the corner trim. Work with patience and check if the tiles are lain properly.
If the top tile won’t stay into position, you could use a wooden support, until the adhesive dries out and it gets locked into position. Work with patience and use a spirit level, as to make sure the wall tiles are plumb.

Next, you have to install the tile corner trims, as to obtain a nice look and to get the job done quicker. You can tile around a window without installing corner trims, but the edges will be exposed and noticeable, therefore having an unattractive appearance.

As you can easily see, tiling around a window is not difficult if you use the right tools and materials. From our experience, we can say that you will get the best look by installing corner trims. Last but not least, make sure you center the window when making the tile layout, as to be able to install cut tiles (wider than 2”) round it.
Thank you for reading our article on how to tile around window and we recommend you to check out the rest of our projects. Don’t forget to Like our articles and to share them with your friends by using the social media widgets.


Using that plastic and porcelain tile is about the most ugliest thing I have ever seen. Try Travertine or natural stone ?
I can’t believe you went through all this trouble to set up a great web site then fill it with plastic nosing in the shower?
Thank you for stopping by. This is just a technique that I used for a friend’s house several years ago. I am not stating it is the neatest technique out there, but we were both pretty happy with how it turned out.
I am tiling around an outside window of a garden house. I don’t think I want to use thin set because you could see it around the edges. I used a spray adhesive inside under the counter, it worked but I had to really work on it to make it stay on the surface. They fell to the ground a lot. My question is, what is the best adhesive to use? If it is thin set, can I just put the thin set on the back of the tile and stick it on the wall? Help. BTW, Jonesy is not very nice.
Thanking you in advance.
Yes, you can apply the thin set to the back of the tiles and then stick them to the wall. Just make sure you apply an even coat of thin set to the tiles, by using a trowel. If the garden house is not heated, you need to use a weather resistant thin set. Let me know how it turns out.